How to Replace a Bathtub Overflow Plate Without Leaks
Direct answer: Replace a bathtub overflow plate by matching the old cover style, screw spacing, gasket area, and backing bracket before tightening anything. If the mount is missing or the overflow tube moves, stop and use the right adapter or repair path instead of forcing long screws.
This is a small repair, but it is easy to make worse by forcing the wrong cover. Take the old plate off slowly, protect the drain from dropped screws, identify the mounting style, and snug the new plate evenly. You are holding a cover flat against the tub, not clamping heavy hardware.
Before you start: Match the overflow plate style, screw spacing, and mounting layout before ordering. If the cover does not have a visible mounting plate or bracket behind it, identify whether you need a snap on cover, adapter bar, retrofit bracket, or trip lever plate before buying parts.
Last reviewed: 2026-05-28
Match the overflow plate before you force the cover
Bathtub overflow covers look interchangeable until the bracket, trip lever, screw spacing, or missing mounting plate proves otherwise.
Direct replacement
This page fits when: The old plate, screw spacing, and backing bracket are intact, and the new cover matches the same one-screw, two-screw, snap-on, or trip-lever style.
Check something else when: Use the matching screws and snug the cover evenly. Do not overtighten against old tub finish.
Missing mounting plate
This page fits when: There is no visible bracket or the old cover used an adapter, snap-on design, or retrofit bar.
Check something else when: Buy the correct adapter or retrofit plate. Long random screws can miss the bracket or pull the overflow tube out of position.
Drain linkage or leak concern
This page fits when: The old plate has a trip lever, loose linkage, water stains below, or movement in the overflow tube.
Check something else when: Slow down and inspect the gasket, linkage, and tube alignment before treating this as a cosmetic cover swap.
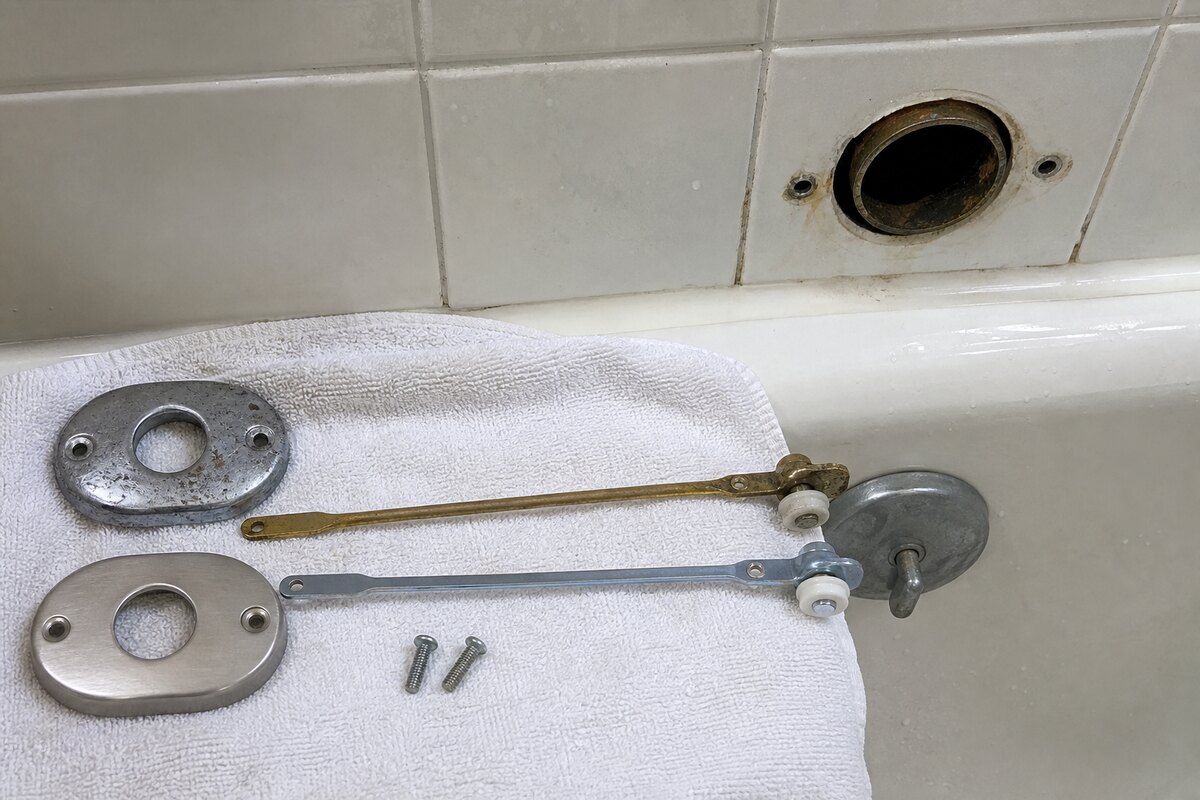
What you are matching behind the plate
The visible cover is only part of the job. The screw holes, gasket area, and bracket behind the plate decide whether the replacement will sit flat and stay leak-resistant.
Before tightening the new plate, confirm the screw holes and gasket area line up naturally. Do not use screw force to pull the overflow into place.
Step-by-step fix
Step 1: Identify the overflow style before you buy
Look at the plate on the tub wall below the faucet and check for rust, cracks, missing screws, a bent cover, or a loose fit.
If your tub has a trip lever on the plate, move the lever up and down and note whether the plate is damaged even if the drain still works.
Confirm the issue is the visible plate itself, not a leak from behind the wall or a broken drain assembly deeper in the tub waste line.
If there is no mounting plate or bracket behind the cover, identify whether your tub uses a snap-on cover, adapter, or other overflow style before buying a replacement.
Take a quick photo before removal so you can match the style and screw layout.
If it works: You know the plate needs replacement and you have a reference for the old setup.
If it doesn’t: If the plate looks fine but the tub still will not drain or stop properly, the real problem may be the linkage or drain parts rather than the plate alone.
Stop if:
Water is leaking into the wall or ceiling below the tub area.
The overflow opening is badly corroded, loose in the tub, or the assembly behind the tub moves freely when touched.
You cannot identify a matching replacement style for the existing setup.
Step 2: Protect the drain and remove the old plate slowly
Put a towel in the tub or over the drain so dropped screws do not disappear into the drain opening.
Remove the screws from the overflow plate while supporting the plate with your free hand.
Pull the plate straight toward you slowly. If it is stuck by soap buildup or old residue, wiggle it gently instead of prying hard against the tub finish.
If the plate has a trip lever and linkage attached, ease the assembly out carefully so you do not bend the rod or let parts scrape the tub.
If it works: The old plate is off, any linkage is still under control, and the overflow opening is visible without scratched tub finish.
If it doesn’t: If the plate will not move after the screws are out, work gently around the edge and look for old sealant or corrosion. Do not pry hard against the tub surface.
Stop if:
The screw spins but will not back out, which can mean the retainer behind the tub is loose or rusted.
The overflow tube or bracket moves freely behind the tub.
A trip-lever linkage drops, binds, or will not come out smoothly.
Step 3: Match the new plate before installing anything
Compare the new plate to the old one for overall shape, screw spacing, opening size, and whether it is a plain cover or a trip-lever style.
If your old plate had a lever and linkage, transfer parts only if the new plate is designed to accept them and the pieces match cleanly.
If there is no mounting plate, crossbar, or threaded bracket behind the old cover, check whether your tub uses a snap-on, adapter, or single-screw overflow style before buying parts.
Do not rely on longer screws to grab a missing bracket. That can push the overflow tube out of position behind the tub.
Test-fit the new plate at the opening without tightening screws to make sure it sits flat and the holes line up naturally.
Do not force a plate that needs the screws to pull it into place.
If it works: The new plate matches the screw spacing, cover style, and mounting method before any screws are tightened.
If it doesn’t: If the new plate needs the screws to bend it into place, it is the wrong style or the mounting bracket is missing.
Stop if:
There is no bracket, adapter, or threaded mount for the screws to grab.
The trip-lever plate does not match the linkage style.
You are tempted to use longer screws to reach a missing mount.
Step 4: Clean the overflow opening and hardware
Wipe the tub surface around the overflow opening to remove soap film, grime, and loose rust.
Clean the screw holes and the back side contact area so the new plate can sit flush.
If you are reusing screws, wipe them clean and replace them if the threads are badly rusted or damaged.
Keep debris out of the overflow opening while you work.
If it works: The tub surface and screw holes are clean enough for the new plate to sit flat.
If it doesn’t: If rust or mineral buildup keeps the plate from sitting flat, clean a little more before installing. A clean seat matters more than extra screw pressure.
Stop if:
The overflow opening is loose, badly corroded, or separated from the tub.
Cleaning reveals cracked tub material around the overflow opening.
Step 5: Install the new plate without over-tightening
If your setup uses a trip lever, guide the linkage back into the overflow opening in the same orientation it came out.
Hold the new plate in place and start both screws by hand so they thread evenly.
Tighten the screws a little at a time, alternating sides so the plate pulls in straight.
Snug the screws until the plate is secure and flat against the tub. Stop there. Too much torque can crack chrome-plated plastic, strip the bracket, or pull the overflow tube out of place.
Move the trip lever, if present, to make sure it still travels freely.
If it works: The plate sits flat, the screws are snug, and nothing behind the tub has shifted or bound up.
If it doesn’t: If the plate shifts or will not tighten evenly, back the screws out and realign it before trying again.
Stop if:
The screws never tighten securely.
The plate bows, cracks, or needs force to sit flat.
The trip lever binds after the plate is tightened.
Step 6: Test the repair in real use
Run water into the tub until the water level reaches the overflow opening area while watching the new plate.
Check that the plate stays firm and that water enters the overflow as expected without the cover loosening.
If your plate has a trip lever, operate it several times and confirm the drain opens and closes the same way it did before or better.
Wipe the area dry and recheck after use to make sure the plate remains tight and properly aligned.
If it works: The plate stayed secure during use and the overflow area works normally.
If it doesn’t: If the plate loosens, the lever binds, or you notice leaking, remove the plate and inspect the fit and the overflow assembly behind it.
Stop if:
Water leaks behind the tub or into the wall during the test.
The overflow function or trip-lever operation is worse after replacement, pointing to a deeper drain assembly problem.
Match the opening size, screw spacing, trip lever or plain cover style, and mounting bracket or adapter layout before ordering.
As an Amazon Associate I earn from qualifying purchases. Repair Riot may earn a commission at no extra cost to you.
FAQ
Do I need to turn off the water to replace a bathtub overflow plate?
Usually no. You are working on the overflow cover, not opening the supply lines. Just make sure the tub is not in use while you remove and reinstall the plate.
How do I know if I need a plain overflow plate or a trip-lever plate?
Match what is already on the tub. If the current plate has a lever that helps operate the drain stopper, you need a compatible trip-lever style. If it is just a cover, use a plain plate.
Can I reuse the old screws?
Yes, if they are straight and the threads are in good shape. Replace them if they are rusted, stripped, or no longer tighten cleanly.
What if the new plate does not line up with the screw holes?
That usually means the replacement is the wrong style or size. Do not force it with the screws. Recheck the opening size, screw spacing, and whether your tub uses a trip-lever setup.
How do I replace a bathtub overflow plate without a mounting plate?
First confirm the overflow style. Some tubs use a snap-on cover, adapter bar, or different bracket instead of the two-screw plate you expected. Do not use long screws to reach for a missing bracket; get the correct adapter or matching overflow plate style so the overflow tube is not pulled out of position.
Will replacing the overflow plate fix a tub that will not drain?
Not by itself in most cases. A damaged plate can be part of the problem on a trip-lever setup, but slow draining is often caused by a stopper, linkage, or clog farther down the drain.