Are the marks shallow, scattered, and on firm siding?
Start with a surface repair plan after you clean the area and confirm there is no staining, soft backing, loose siding, or insect debris.
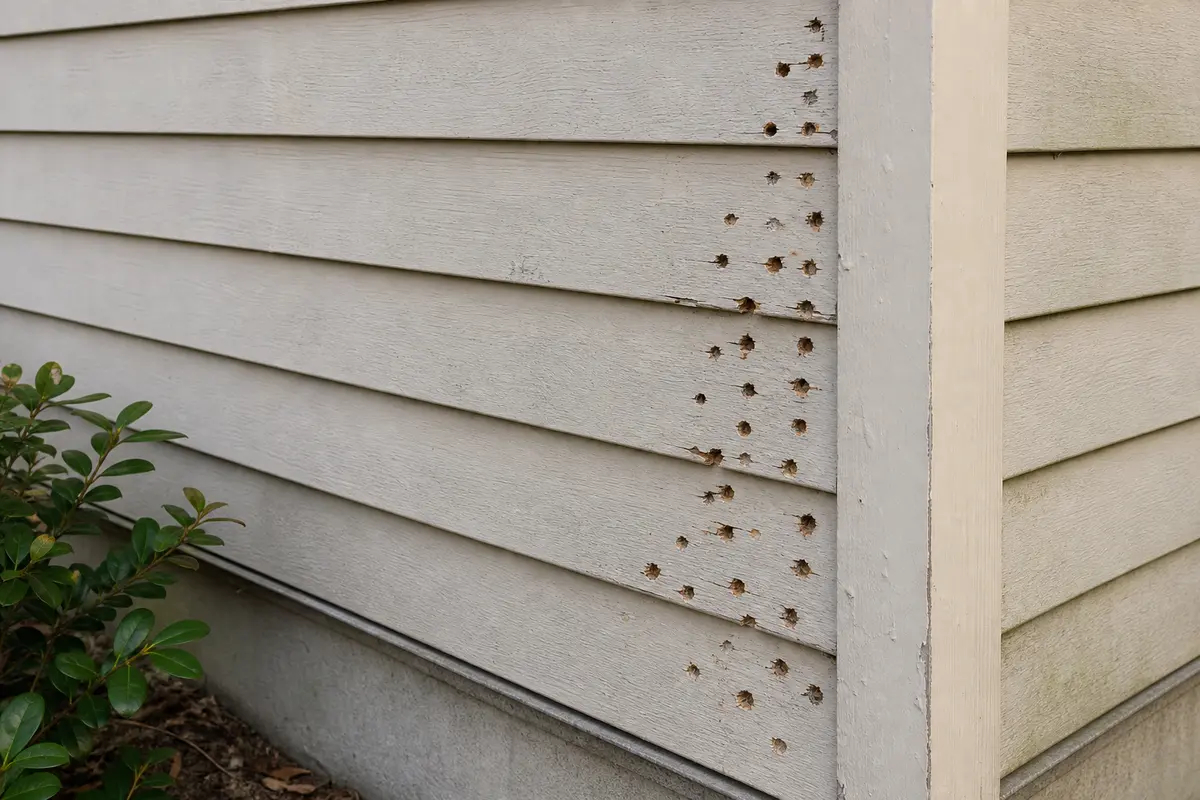
Repeated woodpecker holes in one siding area need a wall check before a patch. Press and tap around the holes, then look for frass, staining, loose laps, or a soft spot that feels different from nearby siding.
A tight cluster near trim, eaves, corners, windows, or a roof-wall joint needs a closer check. Compare it with sound siding and look for frass, staining, soft backing, or a hollow sound.
Sound, dry siding can usually stay a small repair. Softness, stains, debris, or repeat pecking moves the job to source repair before the final patch.
Don’t start with: Do not start by caulking every hole, spraying foam into the wall, or replacing a whole siding run. First press and tap the cluster, then look below it for frass, staining, loose fibers, or ant movement so you know whether the bird opened a wet, insect-active, or hollow pocket.
Start with a surface repair plan after you clean the area and confirm there is no staining, soft backing, loose siding, or insect debris.
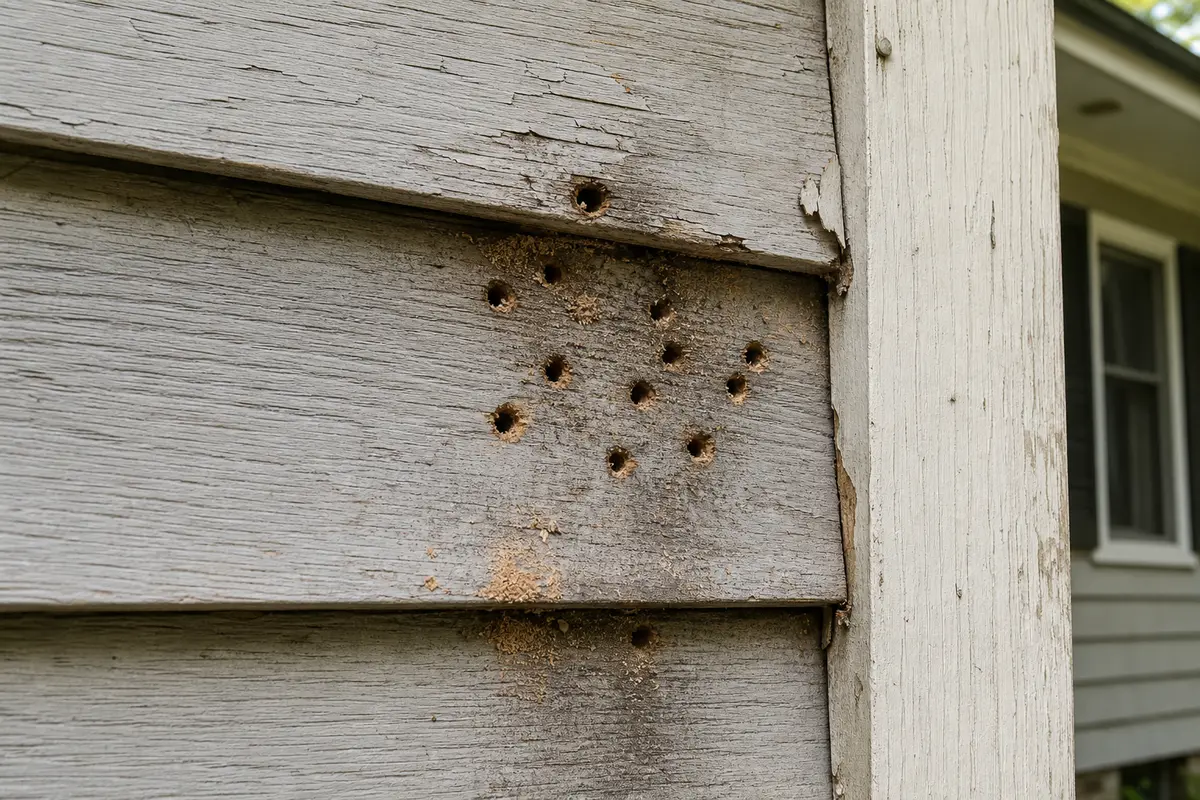
Pause the patch. Press and tap around the cluster, then look below it for frass, stained dust, swollen paint, or a hollow change in sound.
Check the joint above and beside the holes for failed caulk, loose flashing, open seams, peeling paint, and siding that moves when pressed.
Treat the wall as insect-active until proven otherwise. Deal with the pest or damaged substrate before final siding repair.
Do not rely on filler. Open only enough to inspect safely, or bring in a siding contractor before the hole becomes a hidden leak.
Stop the DIY inspection at photos and ground-level notes. Call a siding, exterior repair, pest, or wildlife pro depending on what you found.
A neat patch fails fast over soft, wet, or insect-active backing. Step back for the hole pattern, then look for staining or frass and compare the siding feel with a sound area.
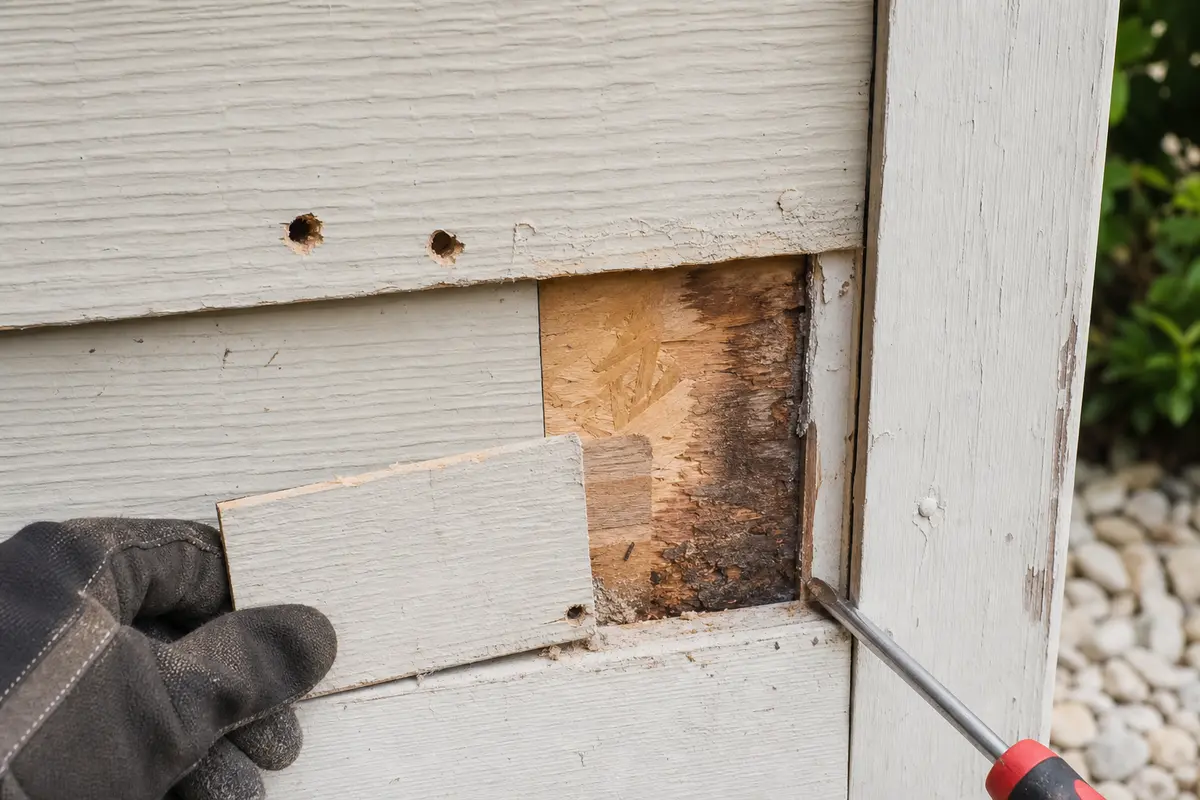
Buy repair material after the wall tells you what failed. Match the exact siding material, profile, exposure, thickness, color or paint plan, and trim-wrap finish before ordering panels or coil. Filler belongs only on shallow damage with hard, dry backing. Pest treatment, flashing repair, or selective opening comes first when the holes sit over soft, stained, hollow, or insect-active wall.
Woodpecker holes are damage, but they are also a clue. The useful question is why this wall spot was easier or more interesting than the siding around it.
The fast repair can trap the exact problem that brought the bird back.
Do one careful pass in daylight. The goal is to sort the wall into surface repair, source repair, or pro inspection before you shop.
| What you find | What it usually means | Next move |
|---|---|---|
| Shallow chips, firm siding, no stains or debris | The damage may be limited to the siding face. | Clean, prep, and use a material-appropriate exterior patch or small panel repair. |
| Deep cluster with sawdust-like debris or ant activity | The bird may be reaching insects or damaged wood. | Treat the insect clue and inspect the related wall area before closing holes. |
| Softness, hollow sound, crumbling edges, or stained paint | Moisture, rot, or weak backing may be behind the siding. | Find the water path or open selectively; do not rely on filler. |
| Cracked vinyl, broken fiber cement, or torn trim wrap | The face material is too damaged for a durable patch. | Replace the damaged piece only after the wall behind it checks sound. |
| High gable, roof edge, or hard-to-reach corner | The inspection risk may be higher than the repair. | Use photos from the ground and call an exterior repair pro for access and opening. |
A gentle feel test tells you more than the hole size. Compare the damaged spot with good siding nearby so you notice changes instead of guessing.
The same hole can show two problems: insects in damp wood, and the water detail that made the wood attractive in the first place.
Keep the repair small when the inspection supports it. The wall should be hard, dry, quiet, and free of insect or leak clues.
Some damage stops being a patch the moment the backing gives way or the repair area becomes unsafe to reach.
Deterrence works best after the wall no longer offers soft material, insects, or an easy cavity.
As an Amazon Associate I earn from qualifying purchases. Repair Riot may earn a commission at no extra cost to you.
Not always. Shallow scattered marks can be cosmetic, but deep holes in one tight area often deserve a check for insects, damp sheathing, soft trim, or a hollow pocket behind the siding.
The spot may offer insects, soft wood, a cavity, or a good drumming surface. A neat patch alone may not stop repeat damage if the wall still has that attraction.
Only for very minor gaps after the wall is confirmed hard and dry. Caulk is not a structural patch for broken siding, torn trim wrap, wet sheathing, or a deep cavity.
Look for frass, carpenter ant movement, tiny exit holes, wings, or repeated pecking in one small area. Those signs mean the bird may be finding food behind the siding.
It can be fresh pecking debris, insect frass, or decayed wood fibers. Clean a small area, watch whether more returns, and check the wall for ants, softness, staining, and hollow sound before patching.
Replace the damaged piece when the panel is cracked, punctured, torn, too thin to hold filler, or cannot sit flat after repair. Keep the replacement local if the wall behind it is sound.
Be more suspicious of water. Those details can leak or stay damp, and damp material can invite insects. Check above and beside the holes before you repair the face.
No. Close the damage and fix the source first. Deterrents are secondary, and they should not block drainage, trap moisture, or damage the siding finish.
Only if you can reach the area from a stable ladder without leaning or working over a roof edge. Otherwise use photos from the ground and call an exterior repair pro.
Repair Riot built this page around homeowner-visible clues: hole pattern, wall firmness, frass, staining, siding movement, and risky access. The sequence keeps cosmetic repair behind the safety and source checks so a patch does not hide rot, insects, or a leak path.