How to Replace a Pressure Washer Spray Wand Without Picking the Wrong Fitting
Direct answer: Before you rebuild a pressure washer spray wand, decide what actually failed. A leaking O-ring or quick-connect seal may be a rebuild. A bent tube, cracked wand body, stripped thread, or loose coupler is a replacement. Shut the washer off, turn the water off, squeeze the trigger until pressure is gone, then disconnect the wand and match the connection before installing anything new.
Pressure washer fittings deserve respect. Stored pressure can surprise you, and a close-enough coupler can pop loose under load. If the wand is kinked or cracked, do not bend it back and hope. Replace it. If the leak is only at a serviceable seal, rebuild that seal and keep the good wand.
Before you start: Match the wand connection style, length, pressure rating, and trigger gun fit before ordering. Relieve pressure first, then decide whether this is a seal rebuild or a full wand replacement.
Last reviewed: 2026-05-31
Decide whether to rebuild or replace the spray wand
A wand leak is not always a wand failure. Separate a bad seal from a damaged tube, coupler, thread, or trigger-gun connection before buying parts.
Rebuild candidate
This page fits when: The wand tube is straight, the body is not cracked, and the leak is limited to an O-ring, quick-connect seal, or serviceable coupler.
Check something else when: Replace the seal or coupler and pressure test. Do not replace the whole wand if the rigid parts are still sound.
Replacement candidate
This page fits when: The wand is bent, cracked, split, heavily corroded, stripped, or loose at a non-serviceable joint.
Check something else when: Match pressure rating, fitting style, trigger-gun connection, length, and nozzle connection instead of trying to straighten or force old parts.
Wrong-system problem
This page fits when: The leak or pulsing starts at the hose, gun, pump, nozzle, or unloader rather than the wand itself.
Check something else when: Fix the actual source first. A new wand will not correct a bad hose O-ring, clogged nozzle, or pump pressure problem.
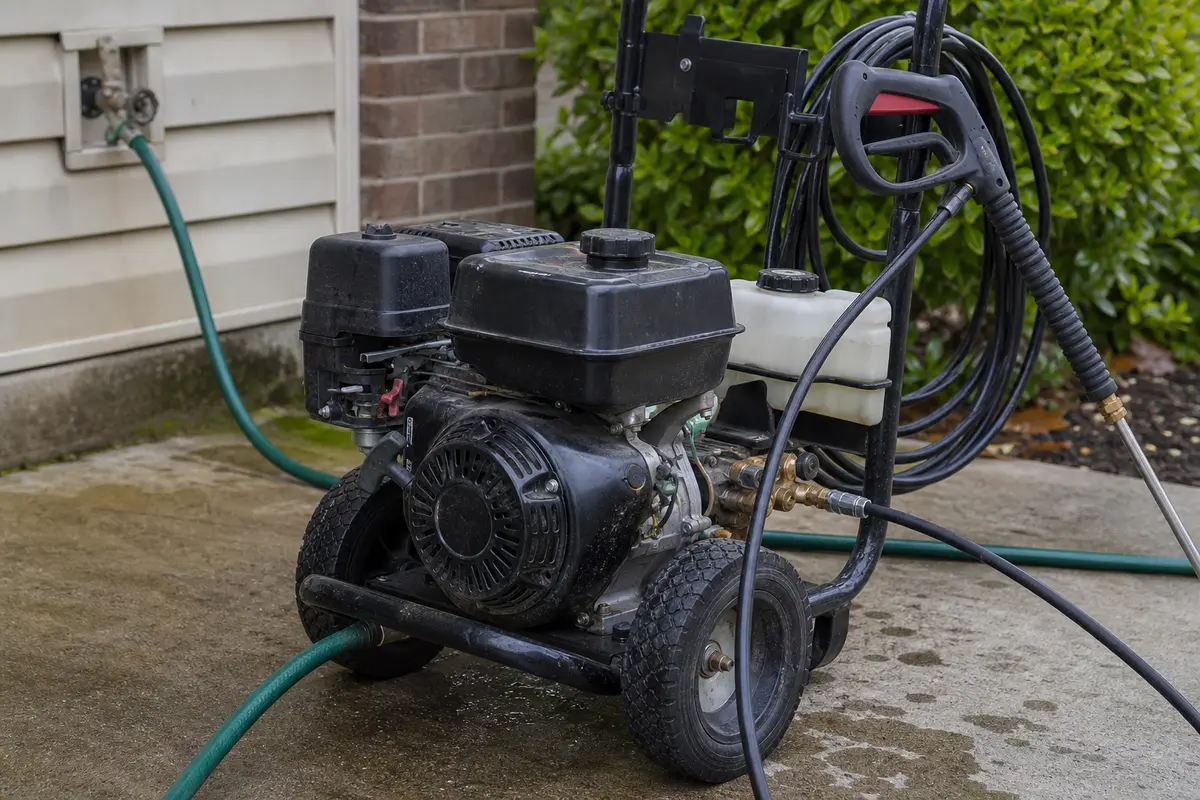
Match the wand to the washer and hose setup
Pressure washer wands need the right connection style and pressure rating for the machine.
Match the wand connector, pressure rating, and nozzle setup before ordering a replacement.
Step-by-step fix
Step 1: Decide whether to rebuild the wand or replace it
Turn the pressure washer off and disconnect the spark plug wire or unplug the unit if it is electric.
Squeeze the trigger to relieve trapped pressure before touching the wand connection.
Inspect the spray wand for bending, cracks, split seams, damaged threads, a loose coupler, or a leaking tip connection.
Treat O-ring, seal, or quick-connect leaks as possible rebuilds if the metal and coupler body are still sound.
Replace the wand if the tube is kinked, cracked, split, or the coupler or threads cannot lock securely.
Check the trigger gun too. If the gun body is cracked or leaking, this is not just a wand repair.
Compare the old wand to the replacement or rebuild parts and make sure the connection style, pressure rating, length, and tip setup match.
If it works: You have a clear wand-related failure and a replacement that appears to fit your machine.
If it doesn’t: If the wand looks fine and the issue is at the trigger gun, hose, nozzle, or pump, diagnose that part before replacing the wand.
Stop if:
The trigger gun body is cracked or leaking.
The hose fitting or gun connection is damaged instead of the wand.
You cannot match the replacement wand to your pressure washer connection.
Step 2: Relieve pressure before touching the fitting
Shut off the water supply and disconnect the garden hose if you want a drier work area.
Point the gun at the ground in a safe direction and squeeze the trigger until water stops and pressure is fully released.
Lay the gun and wand on a stable surface where dirt will not get into the connection.
If your wand uses a quick-connect, pull back the collar and slide the wand out.
If your wand threads into the gun or lance, turn it counterclockwise by hand first and use an adjustable wrench only if needed.
If it works: The old spray wand is off the pressure washer without forcing the connection.
If it doesn’t: If the fitting is stuck, clean the joint, try again with steady pressure, and avoid twisting the trigger gun body hard enough to crack it.
Stop if:
The fitting will not move and the gun body starts flexing or cracking.
You find stripped threads or a broken coupler on the gun side.
Step 3: Clean and inspect the connection point
Wipe the gun-side fitting and the end of the old wand area with a clean rag.
Use a soft brush to remove grit, dried soap, or mineral buildup from the coupler or threads.
Inspect the connection for worn locking balls, damaged O-rings, cross-threading, cracks, or a bayonet/proprietary fitting that does not match your replacement.
If the new wand includes seals or O-rings, make sure they are present and seated correctly before installation.
If it works: The connection is clean and ready for the new wand to seat fully.
If it doesn’t: If the fitting still looks dirty or rough, clean it again so the new wand does not leak or bind during installation.
Stop if:
The gun-side coupler is cracked, badly corroded, or missing internal parts.
Threads are stripped enough that the new wand cannot tighten securely.
Step 4: Install the rebuilt or replacement wand
Align the new wand carefully with the gun connection so it goes in straight.
For a quick-connect style, push the wand in fully and release the collar until it locks.
For a threaded style, start the threads by hand to avoid cross-threading, then snug the connection without overtightening.
If you are rebuilding a seal, use the seal type supplied for the wand and seat it cleanly before reconnecting. Do not use a random O-ring that barely fits.
Give the wand a gentle pull and twist check to confirm it is seated and locked.
Install the spray tip or nozzle if it transfers separately from the old setup.
If it works: The new wand is attached straight, secure, and ready for testing.
If it doesn’t: If the wand will not seat or thread smoothly, remove it and recheck the fit before forcing anything.
Stop if:
The new wand does not lock into the coupler.
The threads bind immediately or start crooked, which usually means the part is not the right fit.
Step 5: Pressurize the system and check for leaks
Reconnect the water supply and turn the water on before starting the pressure washer.
With the machine still off, squeeze the trigger to let water flow through the gun and wand and push out trapped air.
Watch the wand connection closely for drips or spray from the joint.
Start the pressure washer and test the wand at low-demand use first, keeping the spray pointed in a safe direction.
Check that the wand stays rigid, the trigger response feels normal, and water exits only from the nozzle end.
If it works: The connection stays dry or nearly dry, and the wand handles pressure without loosening or leaking.
If it doesn’t: If you see leaking at the connection, shut the machine off, relieve pressure, remove the wand, and reseat it or inspect the seal again.
Stop if:
Water sprays from the side of the wand body or connection under pressure.
The wand starts backing out, wobbling, or will not stay locked in place.
Step 6: Verify the repair in real cleaning use
Use the pressure washer for a few minutes on a normal cleaning task, not just a quick trigger test.
Move through a few trigger cycles and watch for leaks that only show up after pressure builds and releases repeatedly.
Confirm the spray pattern stays consistent and the wand remains straight and secure during use.
After shutting the machine off, relieve pressure one more time and do a final check that the connection has not loosened.
If it works: The new pressure washer spray wand holds securely, sprays correctly, and stays leak-free during actual use.
If it doesn’t: If the problem returns during normal use, inspect the trigger gun connection and nozzle setup next because the root cause may be outside the wand.
Stop if:
The gun, hose, or pump begins leaking after the wand replacement.
The washer still has the same symptom even though the new wand fits and seals correctly, which points to a different failed part.
Match the wand length, pressure rating, quick connect or threaded style, bayonet or proprietary fitting, and trigger gun connection before ordering.
As an Amazon Associate I earn from qualifying purchases. Repair Riot may earn a commission at no extra cost to you.
FAQ
How do I know the spray wand is bad and not just the nozzle?
A clogged nozzle usually affects the spray pattern at the tip. A bad wand is more likely to be bent, cracked, leaking along the tube, or unable to connect securely to the gun.
Is this the same as a wand rebuild?
Sometimes people use that phrase for the same repair, but a rebuild only makes sense when the leak is at a serviceable seal, O-ring, or fitting. If the wand tube is bent, cracked, split, or the coupler will not lock, replacement is the safer move.
Can I straighten a bent pressure washer wand?
No. A kinked or creased wand has already been weakened. Bending it back can leave a weak spot that fails under pressure, so replacement is the better repair.
Can I replace just the wand without replacing the trigger gun?
Yes, if the gun-side connection is in good shape and the new wand matches it. If the coupler or threads on the gun are damaged, the gun may need repair too.
Do I need tools to replace a pressure washer spray wand?
Often no. Many wands use a quick-connect fitting. If yours is threaded and tight, an adjustable wrench may help, but start by hand to avoid damage.
Why is the new wand leaking at the connection?
The most common causes are trapped dirt, a missing or damaged seal, a wand that is not fully seated, or a replacement that does not match the original connection style.