A blank display, low-battery icon, dim screen, or thermostat that keeps resetting can be a battery problem. First confirm the thermostat has a battery door or removable face. Match the exact AA, AAA, or coin-cell type, press the new cells fully into the contacts, and stop if you uncover corrosion, heat marks, or damaged low-voltage wiring.
Start with the symptom and the battery compartment, not the shopping cart. Note the old battery type and polarity, keep the wall plate steady, then test a real heat or cool call before you decide the thermostat itself has failed.
Before you start: Check the thermostat manual, model label, or old batteries for the exact size and type before ordering. Many thermostats use AA or AAA alkaline batteries, but some use coin cells. Stop if the wall plate is loose, wiring is damaged, the battery tray is corroded, or the thermostat shows heat or scorch marks.
Last reviewed: 2026-06-01
Make sure this is the right repair
Before replacing thermostat batteries, separate a simple battery warning from a thermostat power problem. Do not buy batteries until you can identify the battery compartment, the old cell type, and any damage that would keep fresh cells from making contact.
This page fits
This page fits when: The display is blank, dim, resetting, or showing a low-battery icon, and the thermostat has a battery door or removable face with replaceable cells.
Check something else when: If the thermostat has no replaceable batteries, or the HVAC breaker and service switch are off, follow a thermostat power diagnosis instead.
Confirm the fit first
This page fits when: You can match the printed AA, AAA, or coin-cell code, the battery chemistry, and the plus/minus orientation in the tray.
Check something else when: If the old batteries are missing or unreadable, use the thermostat model number or manual before ordering. Similar-looking coin cells are not always interchangeable.
Stop for hidden damage
This page fits when: The faceplate releases cleanly, the battery contacts are dry and clean, and the wall plate stays tight while you work.
Check something else when: Stop if you uncover corrosion, moisture, melted plastic, loose low-voltage wires, bent pins, or a thermostat that feels hot.
How this repair starts
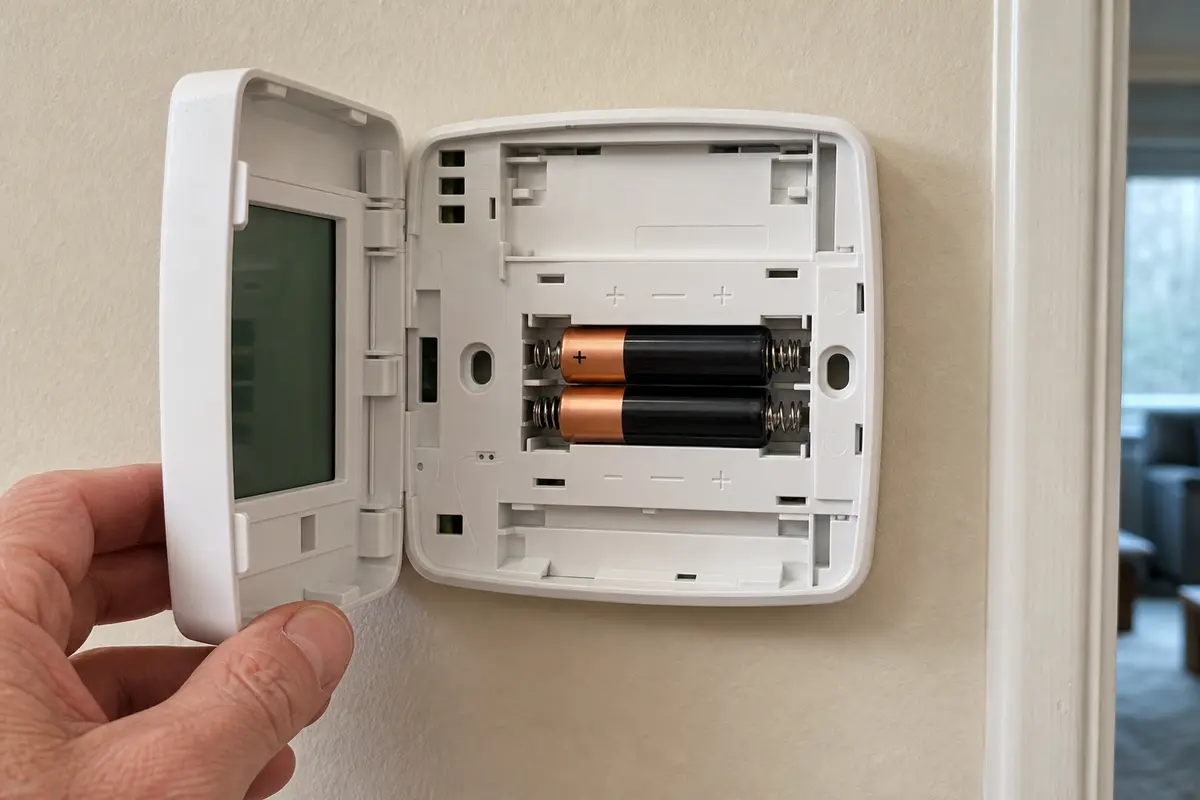
Use the photos to check two things before you close the thermostat: the batteries match the old cells, and the face sits squarely on the wall plate. A good battery swap should not leave a loose cover, bent contact, or warning that comes right back.
Use the exact battery and polarity to avoid continued voltage or display issues.Match the printed battery size or coin-cell code before you order or install replacements.
Safety first
Handle the thermostat cover gently so you do not crack the plastic or pull the wall plate loose.
Use only the same battery size and type the thermostat calls for.
Do not force the faceplate off if it feels anchored by a screw, latch, or wiring.
Stop and call an HVAC pro or electrician if you find burned wiring, melted plastic, repeated sparking, or a thermostat that stays hot after fresh batteries.
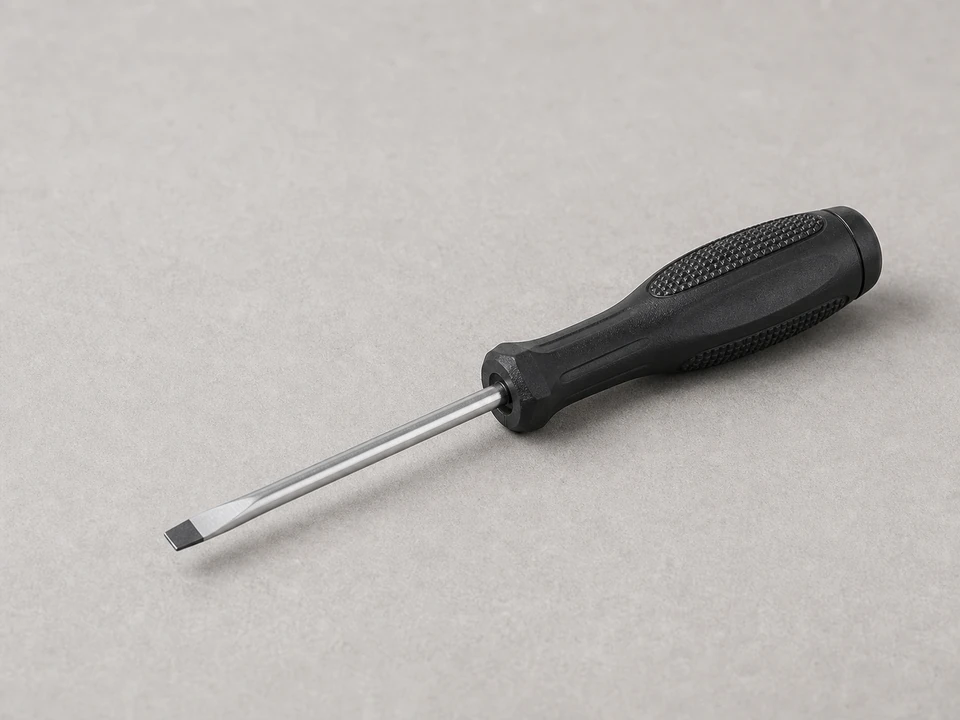
Tools you may need
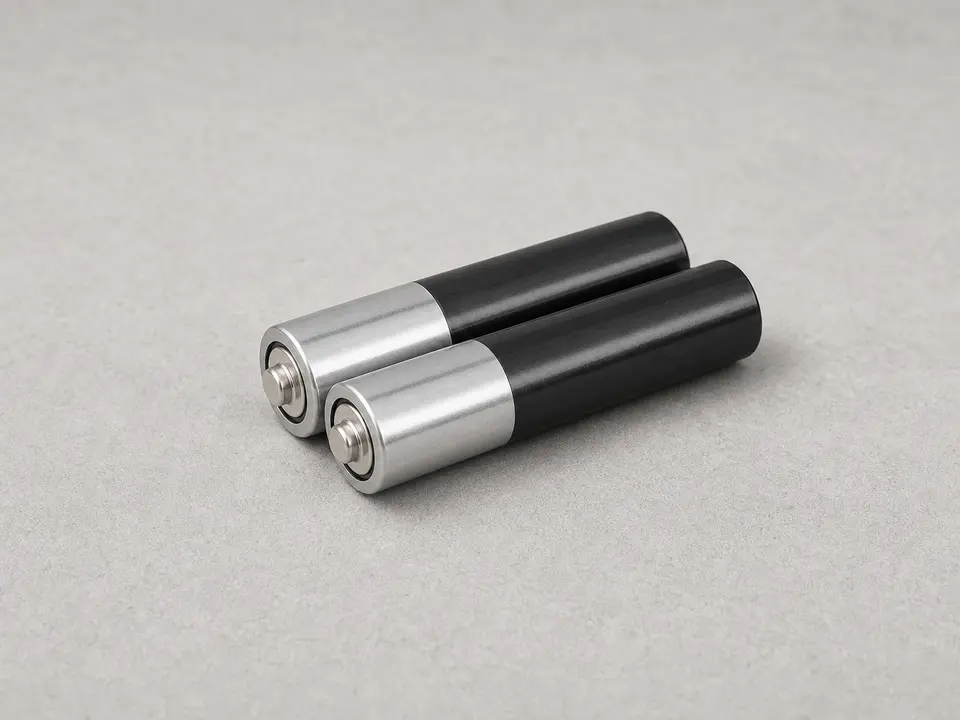
New thermostat batteries
Use it for: Use these when the screen is dim, blank, resetting, or showing a low-battery icon, and match the old cells exactly.
As an Amazon Associate I earn from qualifying purchases. Repair Riot may earn a commission at no extra cost to you.
Step-by-step fix
Step 1: Make sure battery replacement is the right fix
Look at the thermostat display for a low-battery icon, a blank screen, a dim screen, or settings that keep resetting.
Check whether your thermostat actually uses replaceable batteries. Many have a small battery door on the front, side, or bottom, or a removable faceplate with batteries on the back.
If the thermostat is completely dead, confirm the HVAC system still has power by checking that the furnace switch is on and the HVAC breaker is not tripped.
If the thermostat is hardwired and has no battery compartment, stop here. Battery replacement is not the right repair path.
If it works: You confirmed the thermostat uses replaceable batteries and the symptoms fit weak or dead batteries.
If it doesn’t: If the thermostat has no batteries or still has no power after you confirm the HVAC breaker and service switch are on, troubleshoot thermostat power instead of replacing batteries.
Stop if:
The thermostat or wall plate is loose, cracked, scorched, or shows signs of overheating.
You remove the cover and find corroded terminals, water damage, or damaged wiring.
Step 2: Open the thermostat carefully
Take a photo of the screen, schedule, and wiring side of the face if the thermostat may lose its settings.
Look for a latch, bottom tab, side battery drawer, or small retaining screw before you pull on the face.
Hold the wall plate flat against the wall with one hand and pull the thermostat face straight out with the other so the pins or wiring connector do not twist.
Use a small flat screwdriver only at the molded release tab or seam, and stop prying if the plastic bends instead of releasing.
Set the faceplate on a clean cloth with the display facing up so the pins, clips, and screen do not get scratched.
If it works: The battery compartment or back of the thermostat face is open without loosening the wall plate.
If it doesn’t: If the face will not release, look up the model number or manual before forcing it. Some thermostats have hidden tabs or screws.
Stop if:
The wall plate pulls away from the wall or the low-voltage wires start moving with the face.
The faceplate is tethered by wiring you did not expect, or a screw or latch is still holding it.
Step 3: Remove the old batteries and match them exactly
Remove one old battery at a time so you can compare its size, chemistry, and orientation before the compartment is empty.
Read the markings on the battery body, not just the shape. AA and AAA cells are different sizes, and coin cells need the exact code.
Use the flashlight to find the plus and minus symbols in the tray, then compare them with the way the old batteries were sitting.
Look closely for white powder, green residue, rust, swelling, or moisture around the springs and flat contacts.
If the compartment is only dusty, wipe it gently with a dry soft cloth and keep loose dust out of the wall opening.
If it works: You know the exact battery type and polarity, and the contacts look clean enough to hold the new batteries firmly.
If it doesn’t: If the markings are worn off, check the thermostat model number or manual before buying batteries. Guessing with coin cells is a common way to keep the same blank-screen symptom.
Stop if:
Battery leakage has eaten into the springs, terminals, or plastic tray.
You see moisture, rust, scorch marks, melted plastic, or a hot electrical smell inside the thermostat.
Step 4: Install fresh batteries the right way
Install fresh batteries of the same size, code, and chemistry as the old ones unless the thermostat manual says otherwise.
If the screen was blank after the old cells came out, check polarity before you blame the thermostat. Match the plus and minus ends to the tray symbols, especially on coin cells where the flat marked side must face the marked side of the tray.
Press each battery under the spring or contact lip until it sits flat and cannot rattle in the tray.
Check that no battery wrapper, loose dust, or bent contact is keeping the cell from touching metal.
Do not mix old and new batteries, alkaline and rechargeable cells, or different brands in the same thermostat.
If it works: The new batteries sit flat, match the marked polarity, and make firm contact with the tray.
If it doesn’t: If a battery feels loose or the door will not close, remove it and compare the old and new cells side by side before forcing the cover.
Stop if:
A battery gets warm, leaks, bulges, or will not seat without heavy pressure.
A contact spring breaks, collapses, or no longer touches the battery end.
Step 5: Reattach the thermostat and let it restart
Line up the pins or wall-plate rails before you press the thermostat face back on.
Press evenly at the sides or corners until the face sits flush with the wall plate and the battery door is fully latched.
Wait a minute for the screen to power up, then watch for flicker, repeated restarts, or a low-battery message that returns.
Reset the clock, schedule, Wi-Fi, or preferences if the thermostat lost them during the battery change.
If the display still shows low battery, remove the face once and recheck battery polarity, seating, and contact tension.
If it works: The face is flush, the screen starts cleanly, and the low-battery warning stays cleared.
If it doesn’t: If the screen stays blank, remove the batteries and reinstall them once more to confirm the polarity and fit. If it still stays blank, the issue may be thermostat power or a failed thermostat.
Stop if:
The face will not sit flush, the pins look bent, or the wall plate shifts when you press it.
The display flickers when you touch the face or the thermostat feels unusually warm.
Step 6: Test it in real use
Raise or lower the temperature setting enough to call for heating or cooling.
Listen for the HVAC system to respond and give it a few minutes to start if it normally has a delay.
Watch the thermostat screen for stable operation with no flickering, resets, or low-battery warning.
Check again later the same day to make sure the display stays on and your programmed settings hold.
If it works: The thermostat runs normally, keeps its settings, and controls the HVAC system without battery warnings.
If it doesn’t: If the thermostat still acts erratic, loses settings, or does not control the system, recheck battery seating and polarity once. If those pass, look at thermostat wiring, low-voltage power, or a failing thermostat instead of weak batteries.
Stop if:
The HVAC system does not respond and you smell burning, see sparking, or notice unusual heat at the thermostat.
Check your thermostat manual or the old batteries for the exact size and type before ordering. Many thermostats use AA or AAA alkaline batteries, but some use coin cells.
As an Amazon Associate I earn from qualifying purchases. Repair Riot may earn a commission at no extra cost to you.
Verify the repair
The display is bright and steady with no low-battery icon.
The thermostat keeps the correct time and saved settings.
The heating or cooling system responds when you change the set temperature.
The thermostat still works normally several hours later without resetting.
FAQ
How do I know if my thermostat needs new batteries?
Common signs are a blank or fading screen, a low-battery warning, settings that keep resetting, or a thermostat that acts erratic even though the HVAC system has power.
What kind of batteries do thermostats use?
Many thermostats use AA or AAA alkaline batteries, while some use coin-cell batteries. Always match the size and type printed on the old batteries or listed by the thermostat manufacturer.
Do I need to turn off power before replacing thermostat batteries?
For a simple battery swap, you are not disconnecting wiring. Keep the wall plate steady, use only the cover release points, and stop if the cover does not come off easily or if you uncover damaged wiring or corrosion.
Why is my thermostat still blank after new batteries?
First recheck the battery direction and make sure the batteries are fully seated. If that does not help, the thermostat may not be getting low-voltage power from the HVAC system, or the thermostat itself may have failed.
Will replacing thermostat batteries erase my settings?
Sometimes. Some thermostats keep settings during a quick battery change, while others may lose the clock, schedule, or preferences. Taking a photo before you start makes setup easier afterward.
Sources and reference notes
Repair Riot uses related field pages and source references to keep the fit, safety, and stop-condition guidance grounded in real repair situations.
thermostat batteries - Check this cross-reference when you see a blank or fading thermostat display after a battery warning.
thermostat batteries - Check this cross-reference when you see a blank or fading thermostat display after a battery warning.