How to Replace an Exterior Door Threshold Seal for Drafts or Leaks
Direct answer: To replace an exterior door threshold seal, first make sure the draft or leak is really coming from the bottom threshold, then remove the old gasket, clean the track, install the same profile, and test the closed door for even contact.
A good threshold repair is about fit, not force. If the door is square and the threshold is solid, this is usually a clean homeowner job. If the frame is rotted, the threshold is loose, or the door has to be slammed, fix that bigger problem before blaming the seal.
Before you start: Match the old seal profile and threshold track style. A seal that is close but not the same can make the door hard to latch or still leave gaps.
Last reviewed: 2026-06-05
Know whether you need a threshold seal, sweep, or bigger repair
The bottom of an exterior door has a few parts that all get blamed for the same draft or leak. Use this quick check so you fix the part that is actually failing.
Threshold seal is cracked, flat, or missing
This page fits when: The gasket in the threshold track is worn, torn, loose, or no longer touching the bottom of the closed door.
Check something else when: If the threshold seal looks healthy, check the door sweep and side weatherstripping before replacing this gasket.
Door sweep is torn or too short
This page fits when: This page helps only if the threshold gasket is also worn. A torn sweep on the bottom of the door is a separate part.
Check something else when: If only the sweep is damaged, you likely need to replace or adjust the door sweep instead. This page is for the gasket in the threshold track.
Door has daylight at one corner
This page fits when: A threshold seal can help when the gap is even and the seal profile is clearly worn.
Check something else when: If only one corner leaks, inspect corner pads, hinge sag, latch alignment, and side weatherstripping. A new threshold seal may not close an alignment problem.
Threshold, sill, or floor is soft
This page fits when: Do not treat this as a gasket job until the structure is solid.
Check something else when: Soft wood, swelling, rot, or water under the threshold means the sill or subfloor needs attention before any seal will last.
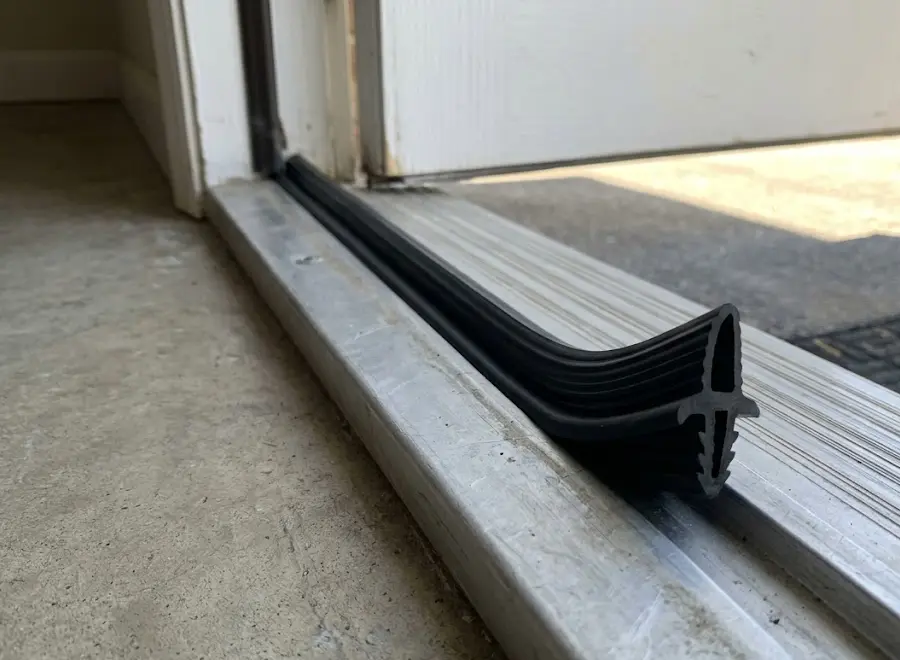
What the threshold seal should look like
Use the profile and track fit as your reference: the replacement seal should match the old gasket and sit evenly in the aluminum threshold channel.
The replacement gasket should match the threshold channel and seat evenly before you test the door.
Step-by-step fix
Step 1: Confirm the threshold seal is the problem
Open the door and inspect the seal along the threshold for cracks, flattening, tears, missing sections, or a gasket that has pulled loose.
Look for water marks, dirt trails, or daylight at the bottom of the closed door, especially near the corners.
Run your hand near the bottom edge on a windy day or after a storm to check for a draft or moisture coming from the threshold area.
Slide a sheet of paper under the closed door in a few spots. If it moves freely where the seal should touch, the bottom seal is not doing its job.
Make sure the door sweep, threshold, and door slab are not obviously bent, rotted, or loose, since those problems can mimic a bad threshold seal.
If it works: You found visible wear or a poor seal at the threshold gasket, and the threshold itself is still solid enough to reuse.
If it doesn’t: If the seal looks intact, check the door sweep, side weatherstripping, and threshold adjustment before ordering a replacement seal.
Stop if:
The threshold is loose, badly corroded, rotted, or pulling away from the floor.
The door frame, sill, or subfloor shows soft wood, swelling, mold, or hidden water damage.
The door is badly out of alignment, drags on the threshold, or will not latch without force.
Step 2: Remove the old threshold seal
Open the door fully so you can work comfortably and keep the area dry and clear.
Find one end of the old seal and lift it gently with a flat screwdriver or trim tool.
Pull the seal out by hand if it is a press-in style, or slide it out of the channel if it is held in a track.
If the old gasket is brittle and breaks apart, remove it in sections so the channel is completely clear.
Save a clean piece of the old seal so you can compare the profile against the new one.
If it works: The old seal is fully removed and you can see the full channel or mounting area.
If it doesn’t: If the seal will not budge, work from both ends and loosen it a little at a time. Damaging the threshold creates a bigger repair than the seal you came to fix.
Stop if:
The threshold channel cracks, bends, or breaks while removing the old seal.
You discover the replacement style does not match how the old seal mounts.
Step 3: Clean and inspect the threshold channel
Wipe out dirt, grit, and loose debris from the channel and the surrounding threshold surface.
Use a mild cleaner on a rag to remove residue so the new seal can sit flat.
Dry the area completely, especially if the threshold was wet from recent weather.
Check that the channel edges are not crushed and that nothing sharp is left behind that could cut the new gasket.
If it works: The threshold is clean, dry, and ready for the new seal.
If it doesn’t: If residue keeps the channel rough or sticky, clean it again until the new seal can slide or press in without binding.
Stop if:
The threshold mounting area is too damaged to hold a new seal securely.
You uncover rust-through, rot, or missing material that leaves gaps under the threshold.
Step 4: Match and cut the new seal
Lay the new exterior door threshold seal next to the old one and compare the profile, width, height, and mounting style. Bring a piece of the old seal to the store if you are not sure.
Measure the opening or use the old seal as a guide for length.
If the new seal is longer than needed, trim it carefully with a utility knife so it matches the original length or the threshold width.
Keep the cut square so the ends fit neatly against the jambs or threshold edges.
Do not choose a taller seal just to hide a gap. A too-tall gasket often folds over, pulls loose, or makes the door hard to close.
If it works: The new seal matches the old style closely and is cut to the correct length.
If it doesn’t: If the new seal profile is clearly different or much taller or wider than the old one, pause and get a better match before installing it.
Stop if:
The replacement seal is the wrong profile or mounting type for the threshold.
Step 5: Install the new threshold seal
If the new gasket is stiff from cold storage, warm it indoors or with warm water so it flexes without kinking.
Start at one end of the threshold and press or slide the new seal into the channel, following the same orientation as the old one.
Work across the threshold evenly so the gasket does not twist or bunch up.
Seat the seal fully along the entire length with your fingers, checking that both ends sit flush and the top of the gasket is even.
Close the door slowly once to make sure the seal compresses without folding over or pulling out.
If the door has an adjustable threshold, make small height changes only after the new seal is fully seated.
If it works: The new seal is fully seated, even across the threshold, and the door closes against it with light resistance.
If it doesn’t: If one section pops up or shifts, reopen the door and reseat that section before testing again.
Stop if:
The door will not close or latch because the new seal is too large even after confirming it is seated correctly.
Step 6: Test the repair in real use
Close and latch the door several times to make sure the seal stays in place and the door still operates normally.
Check from inside for visible light, drafts, or uneven contact along the bottom edge.
If weather allows, spray a small amount of water at the outside bottom of the closed door and watch for leaks inside. Keep the spray gentle; this is a weather test, not a pressure-washer test.
Recheck the threshold after a day or two of normal use to make sure the seal has not shifted or pulled loose.
If it works: The door closes normally, the bottom edge seals evenly, and no draft or water gets past the threshold in normal use.
If it doesn’t: If you still have a leak or draft, inspect the door sweep, threshold height, corner gaps, and side weatherstripping for a second source.
Stop if:
Water is still entering under the door even with a properly fitted new seal and no obvious installation issue.
The floor or trim inside shows ongoing moisture damage after the seal replacement.
Match the old seal profile and threshold track style. A seal that is close but not the same can make the door hard to latch or still leave gaps.
As an Amazon Associate I earn from qualifying purchases. Repair Riot may earn a commission at no extra cost to you.
FAQ
How do I know if the threshold seal is bad or if the door sweep is the real problem?
If the gasket mounted in or on the threshold is cracked, flattened, or missing, replace that first. If the threshold seal looks good but the flexible strip on the bottom of the door is torn or not reaching the threshold, the door sweep may be the real issue.
Can I replace just the seal without replacing the whole threshold?
Yes, if the threshold is still solid, straight, and able to hold the new gasket. If the threshold is loose, rotted, badly corroded, or damaged where the seal mounts, replacing only the seal usually will not last.
What if the new seal makes the door hard to close?
That usually means the profile is too tall, too wide, reversed, or not fully seated in the channel. Double-check the fit and orientation first. If it is installed correctly and the door still will not close normally, you likely need a better-matched replacement or a threshold adjustment.
Do I need adhesive to install an exterior door threshold seal?
Usually no, if the seal is designed to press into or slide into a threshold channel. Use the mounting style the threshold was designed for. A mismatched seal should not be glued in as a workaround.
Why is water still getting in after I replaced the threshold seal?
The leak may be coming from a worn door sweep, side weatherstripping, an out-of-adjustment threshold, a bad corner pad, or water getting under or around the threshold assembly itself. If the floor or framing is staying wet, inspect for hidden damage and a larger sealing problem.