Does it thump once per drum turn?
Suspect drum rollers, roller shafts, or a flat spot. The sound usually repeats at a steady drum rhythm.
Stop for gas odor, burning smell, scraping metal, or a dropped drum. If the noise is steady, match rhythm: thump means rollers, startup squeal means idler or belt, and lower-front rattle means lint path or blower.
Watch the timing. A thump at the same spot each drum turn usually points to a roller; first-minute squeal usually points to the idler or belt.
Use the sound, timing, and drum feel before ordering parts. Unplug the dryer before opening panels, and avoid disturbing the gas line.
Don’t start with: gas burner parts. Most dryer noises are mechanical, not fuel-system failures, and gas odor means stop instead of opening the cabinet.
Suspect drum rollers, roller shafts, or a flat spot. The sound usually repeats at a steady drum rhythm.
Suspect the idler pulley or belt path. Stop if the belt is frayed or the drum stops turning.
Inspect the felt seal, glide, and drum support area with the dryer unplugged.
Look for coins, screws, lint chunks, or blower wheel damage before buying roller parts.
Check leveling, load size, drum support, and blower wheel before replacing a control or gas part.
Stop. Gas odor or unusual ignition is not a noise repair; use the gas utility or a qualified technician.
Listen before opening the dryer. A steady thump, high squeal, scrape, or lint-path rattle leads to different parts.
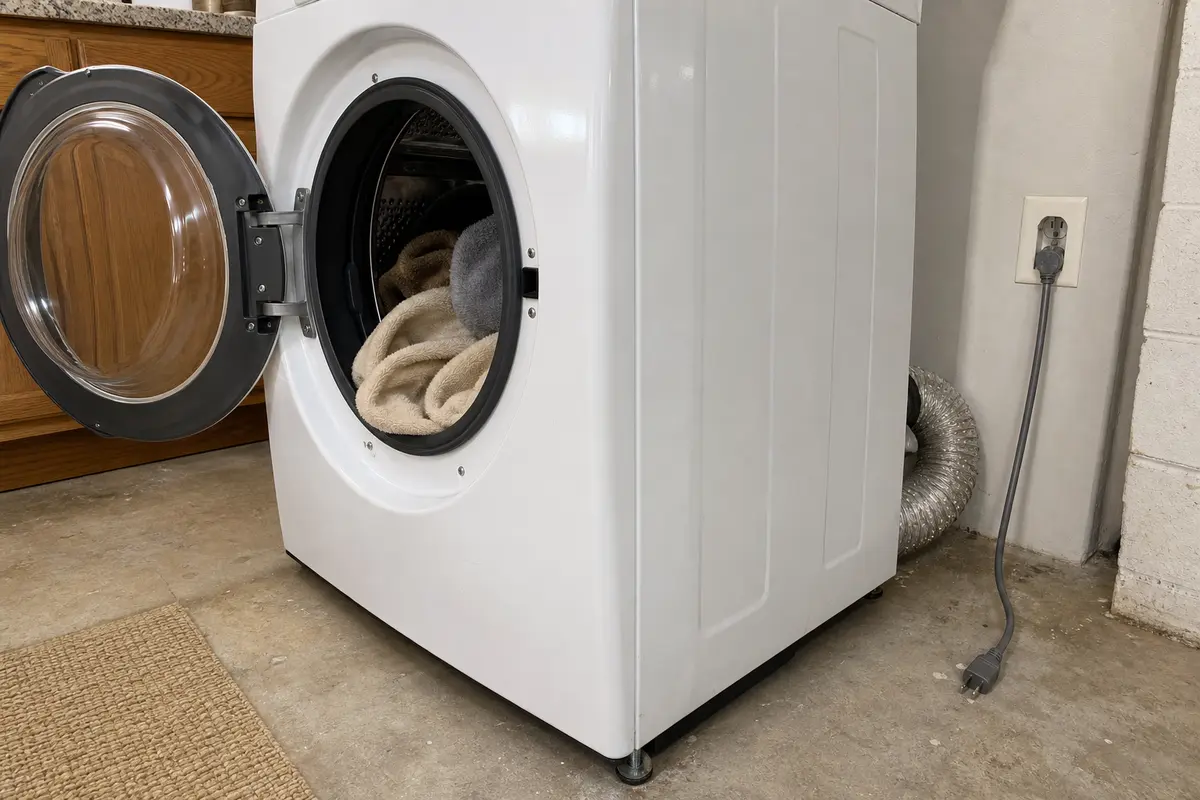


Before buying rollers, an idler pulley, belt, felt seal, blower wheel, or motor, identify the noise pattern and copy the full model number. Keep the dryer unplugged for cabinet checks, and stop for gas odor, burned wiring, or rough ignition.
Most LG front-load gas dryer noises are mechanical. Good clue: the dryer heats normally, but the sound repeats with drum rotation or comes from the lint/blower area.
A noisy dryer can get worse if you run it until the belt breaks or the drum drops.
Run only a short listening test if the dryer is not scraping, smelling hot, or showing gas odor.
| Sound | Likely area | Next move |
|---|---|---|
| Thump once per drum turn | Drum rollers or roller shafts | Unplug the dryer and inspect rollers for flat spots, wobble, or rough rotation. |
| Sharp squeal or chirp | Idler pulley or belt path | Inspect idler pulley spin, belt wear, and belt routing before ordering. |
| Scrape from front or rear rim | Felt seal, glide, or drum support | Stop if metal is contacting metal; inspect the seal and support area with power off. |
| Rattle near lint screen | Loose object, lint chunk, or blower wheel | Check accessible lint path and blower housing; use service if cabinet access is beyond safe DIY. |
| Boom, gas odor, or rough ignition | Fuel or burner safety issue | Stop using the dryer and call the gas utility or a qualified technician. |
The drum rides on support parts. A good clue is a sound that repeats with drum rotation, not blower speed.
A rattling dryer is not always a roller. Good clue: the noise is lower front, near the lint screen, or changes with airflow.
These tools support inspection with the dryer unplugged. Skip tool work for gas odor, scorched wiring, or cabinet access you cannot do safely.
Paid links. As an Amazon Associate I earn from qualifying purchases. Repair Riot may earn a commission at no extra cost to you.
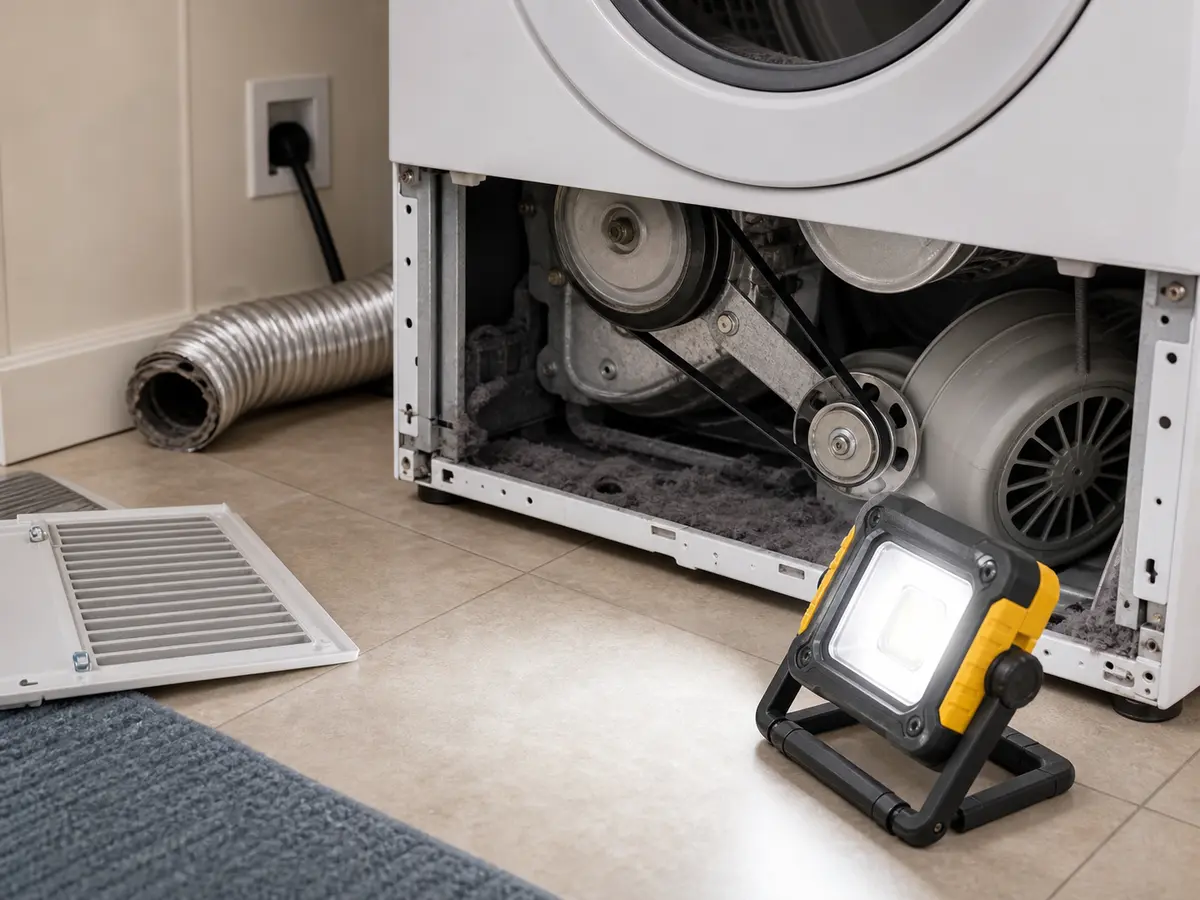
Helps when: Lighting the lower cabinet, roller path, belt route, and blower area while the dryer is unplugged.
Skip it when: Gas odor, burned wiring, or a panel that will not come off cleanly means stop.
Compare work lights on Amazon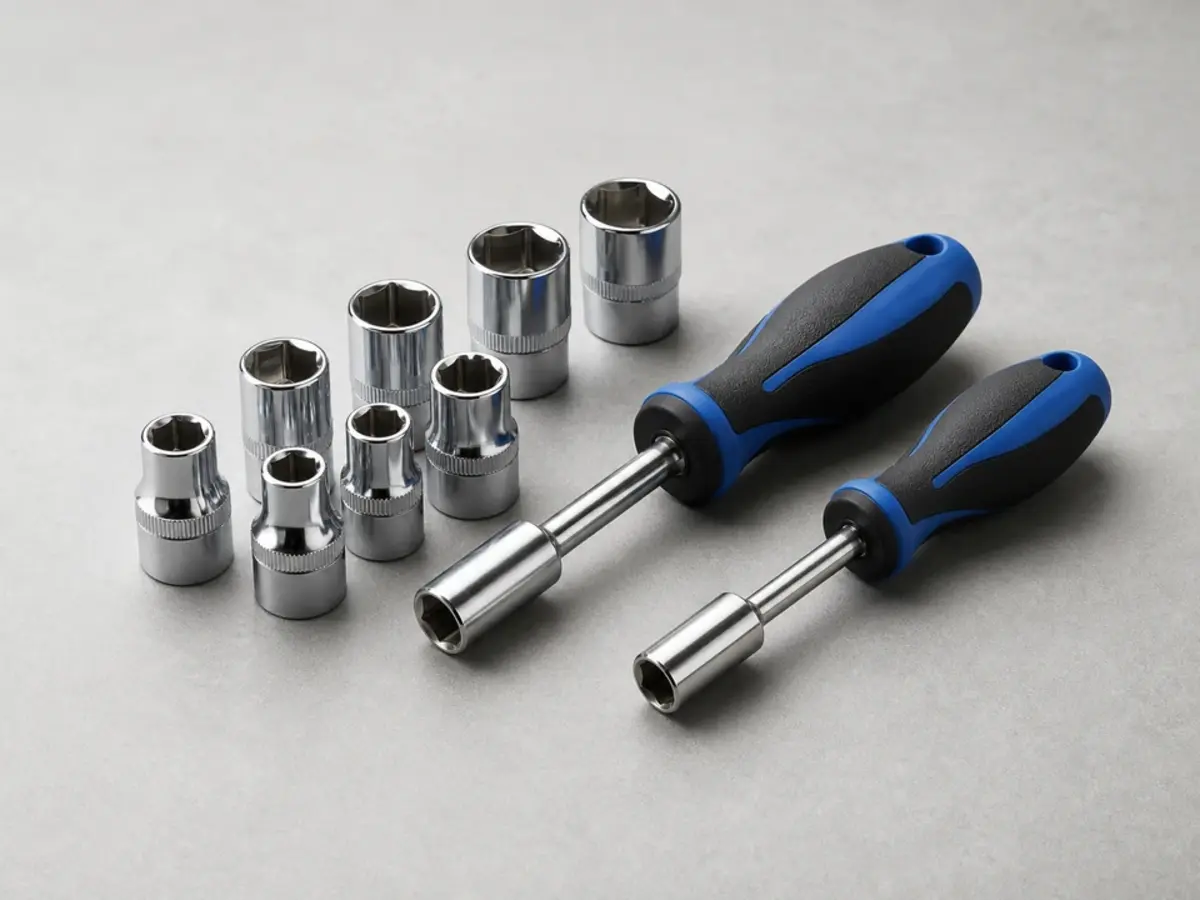
Helps when: Removing common dryer panel screws and blower-cover fasteners on models that use hex heads.
Skip it when: The next fastener is near gas tubing, damaged wiring, or an unknown bracket.
Compare nut driver sets on Amazon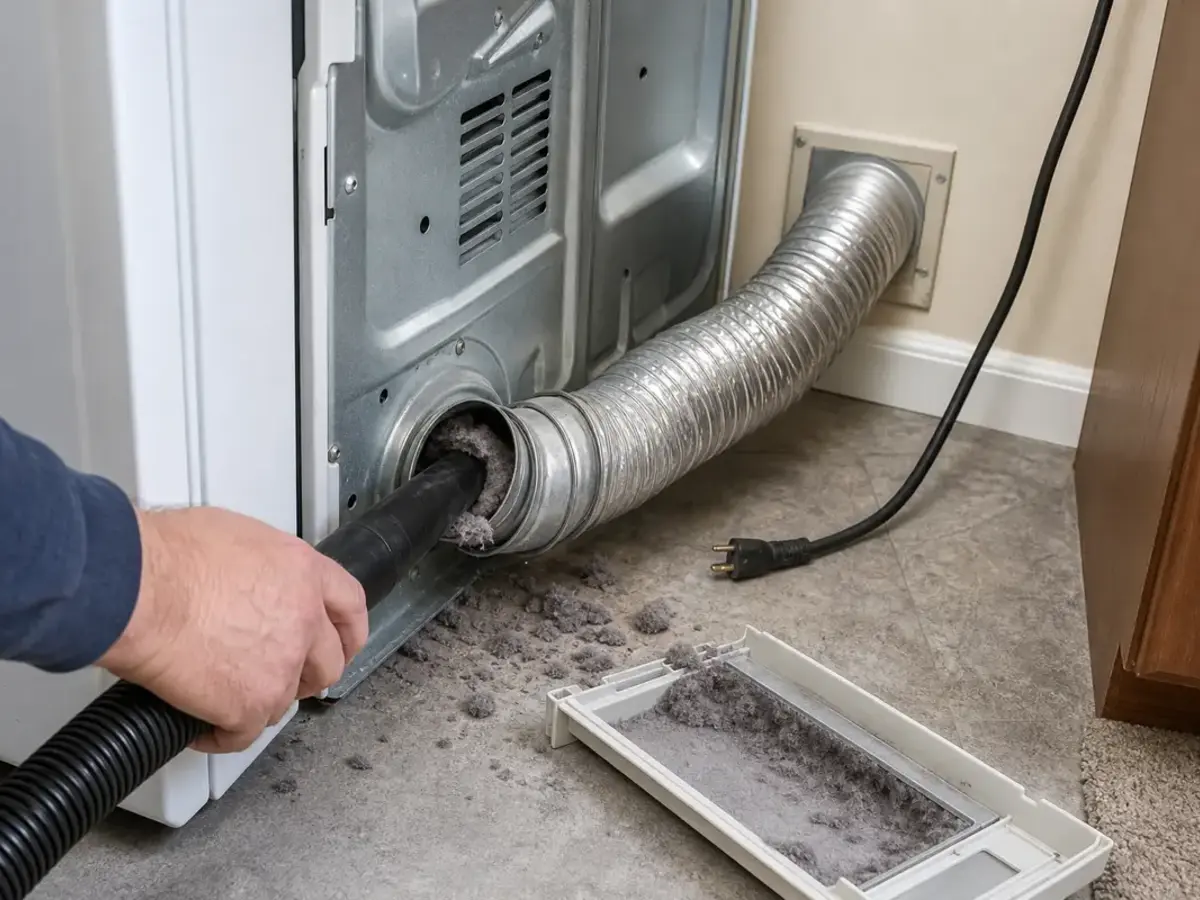
Helps when: Cleaning loose lint around accessible blower and lint housing areas after the dryer is unplugged.
Skip it when: The lint is packed around wiring, burner parts, or areas you cannot reach without unsafe disassembly.
Compare vacuum crevice tools on AmazonMatch parts to the sound and the worn part you can see. LG dryer rollers, idlers, belts, and seals are model-specific.
Paid links. As an Amazon Associate I earn from qualifying purchases. Repair Riot may earn a commission at no extra cost to you.
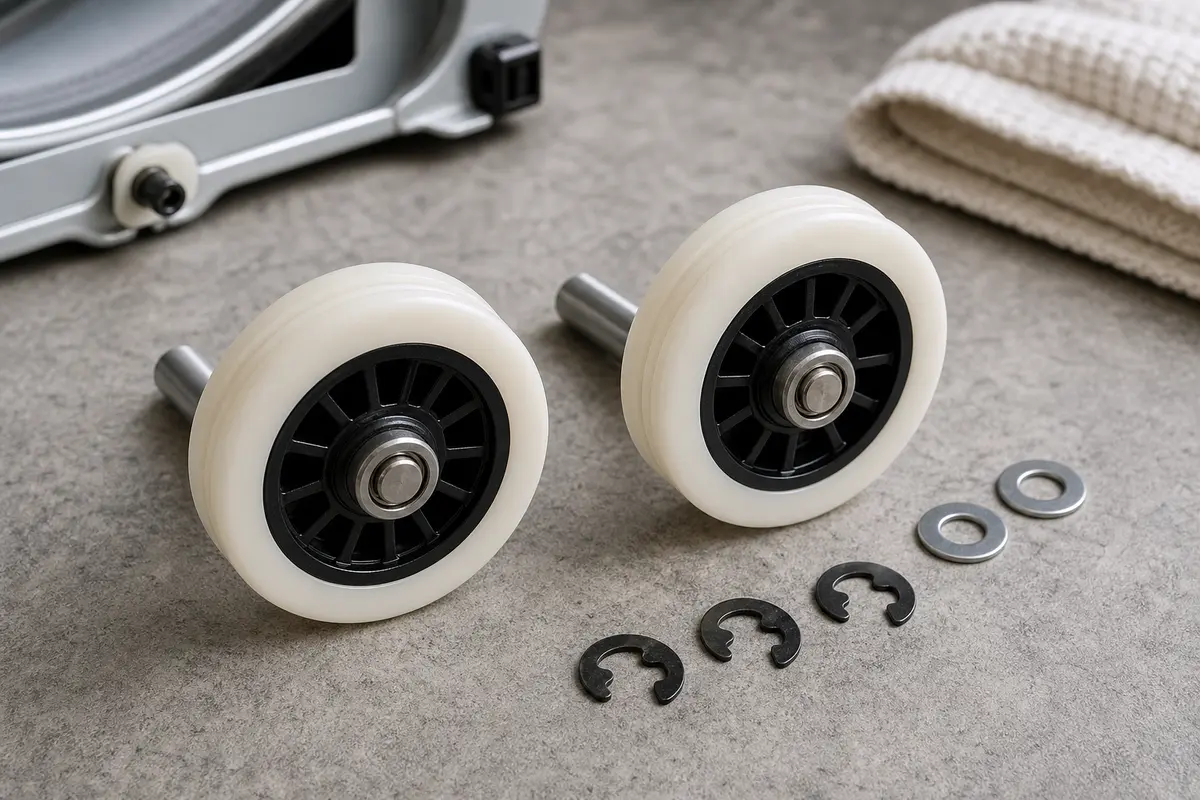
Helps when: The dryer thumps once per drum turn and a roller is flat-spotted, wobbly, seized, or rough by hand.
Skip it when: The noise is from the blower or lint path, or there is gas odor, rough ignition, or burner behavior that needs service.
Compare dryer drum roller kits on Amazon
Helps when: The dryer squeals or chirps and the idler pulley feels rough, loose, or angled against the belt.
Skip it when: The pulley spins smoothly and the sound is a drum-edge scrape or blower rattle.
Compare dryer idler pulleys on Amazon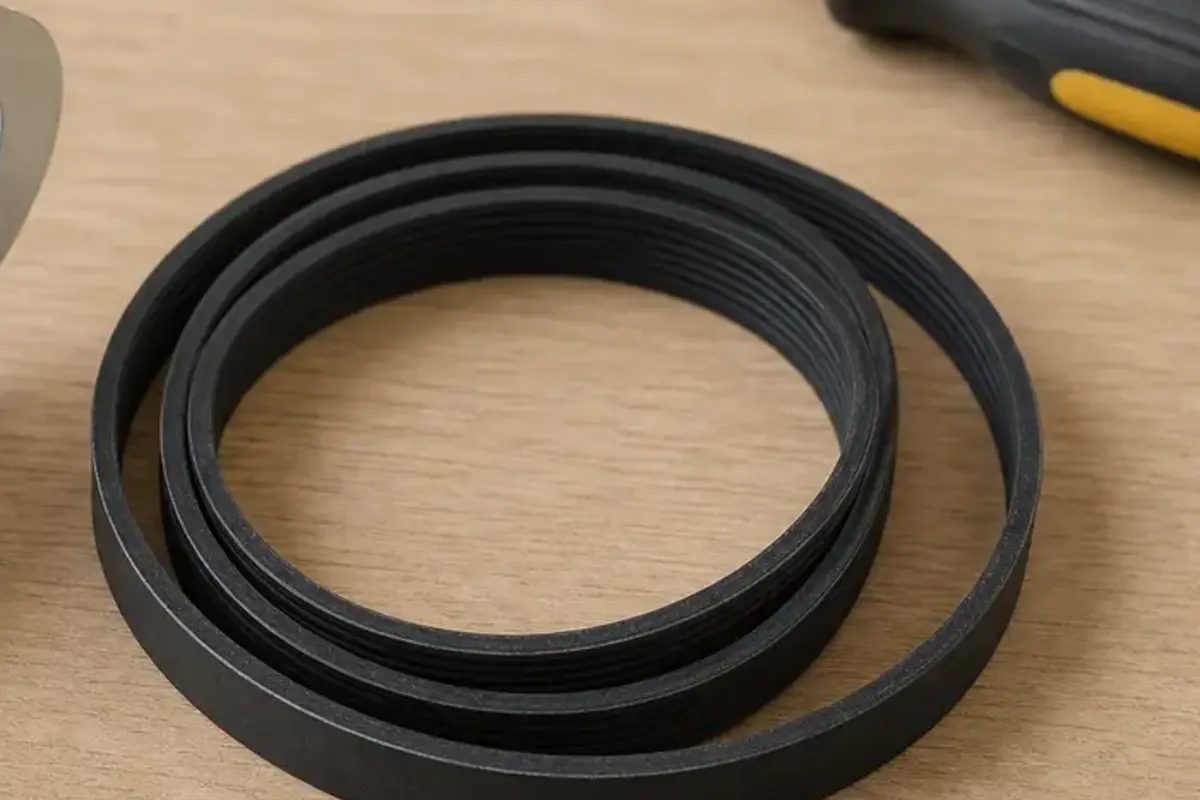
Helps when: The belt is cracked, frayed, missing ribs, glazed, or slipping after the idler and rollers are inspected.
Skip it when: The belt looks good and the noise is a roller thump, seal scrape, or blower rattle.
Compare dryer drive belts on Amazon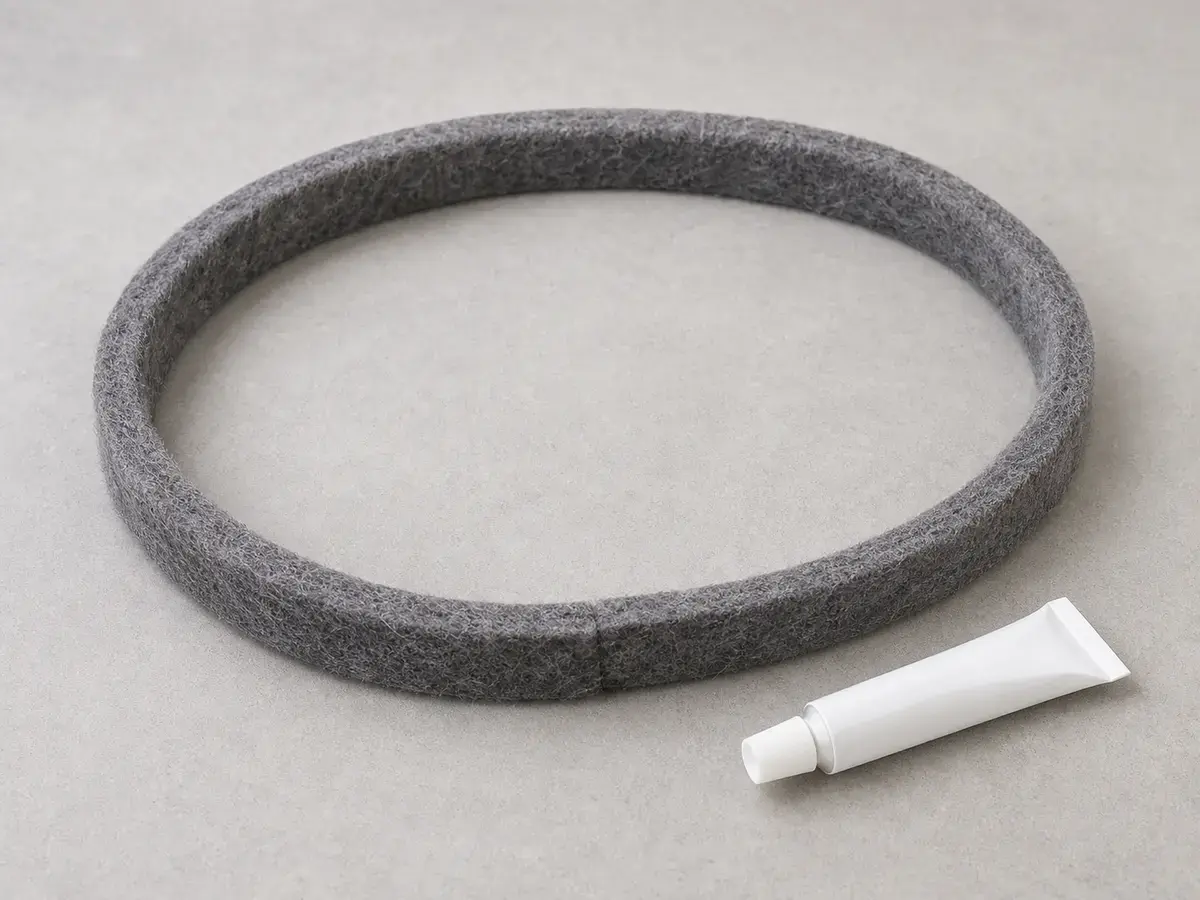
Helps when: The drum edge scrapes and the felt seal is torn, bunched, worn through, or leaving lint at the rim.
Skip it when: The scrape is actually a loose object in the blower or a roller support problem.
Compare dryer felt seals on AmazonA thump that repeats once per drum turn usually points to a worn drum roller, flat spot, or roller shaft. Unplug the dryer before checking, and stop if the drum looks low or metal is scraping.
A sharp squeal at startup often comes from the idler pulley, belt path, or dry support parts. Unplug the dryer before checking the belt or idler.
Most thumps, squeals, scrapes, and rattles are mechanical. Gas odor, delayed ignition, or a boom is different; stop using the dryer and call the gas utility or a qualified technician.
Only if inspection supports it or a model-specific kit includes the worn parts. If one roller is flat-spotted, check the idler and belt while the cabinet is open.
Look for loose objects, lint chunks, or blower wheel damage in the accessible lint path with power disconnected. Do not reach near the blower while the dryer is powered.
Not if it scrapes, smells hot, thumps hard, or the drum looks off-center. Continuing can break the belt, damage the drum support, or create a lint heat risk.
A torn felt seal, worn glide, or damaged support can scrape. Inspect the drum rim and seal area before buying parts because blower debris can sound similar.
Keep movement minimal. For basic listening, you usually do not need to move the connector; do not pull the dryer far enough to strain it, and use a qualified technician if the connector must move.
Copy the full model number, the sound pattern, and the worn part dimensions or layout. Roller shafts, idler brackets, belt length, and seal positions vary.
Repair Riot built this page around observable dryer-noise clues: sound timing, drum rhythm, support path, belt path, blower area, gas odor, and heat/smell stop points. The source links support dryer airflow, lint, and fire-risk context; the repair sequence is original guidance.