What you’re seeing at the soffit
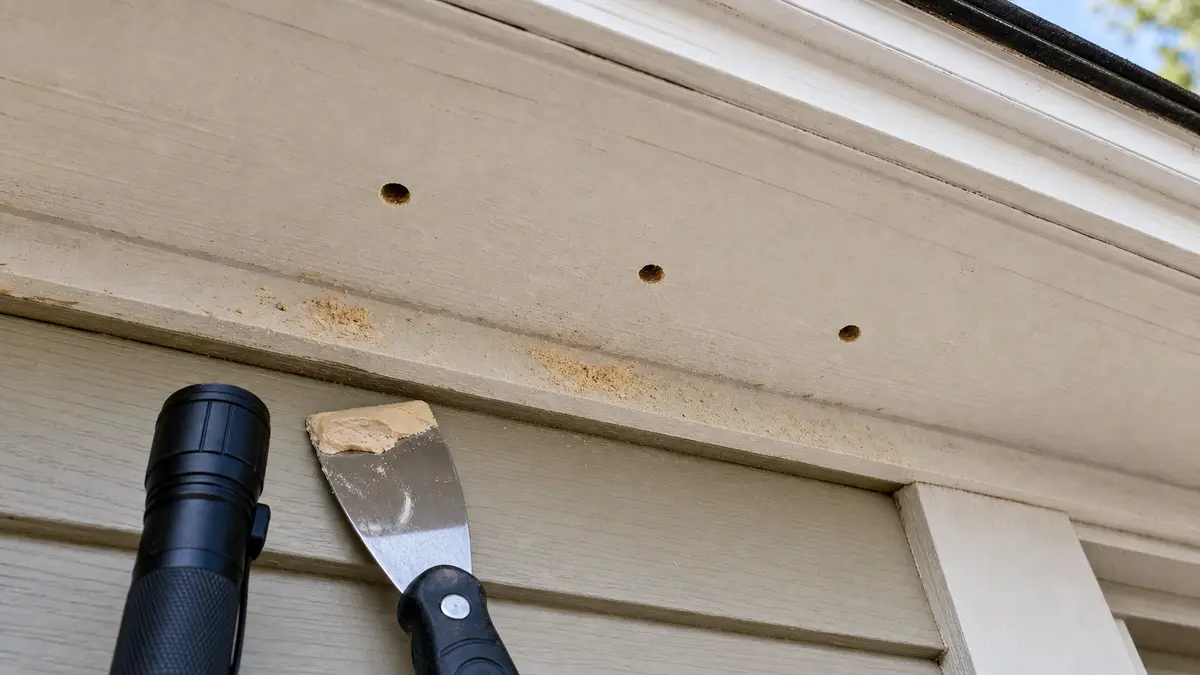
Perfectly round holes in solid wood soffit
The openings look almost drilled, usually about finger-width or smaller, with crisp edges and little surface tearing.
Start here: Check for fresh dust, staining, or bee activity around the hole before you patch anything.
Holes with yellow or brown streaks below
You see staining on the face of the soffit or siding below the hole, sometimes with dark smudges near the opening.
Start here: That usually points to an active or recently active nest, so confirm activity before sealing it.
Holes in soft or crumbling soffit wood
A screwdriver sinks in easily, paint is peeling, or the panel sounds hollow and punky beyond the hole itself.
Start here: Shift quickly to checking for rot and moisture, because patching alone will not hold.
Irregular holes, splits, or shredded wood
The damage is ragged instead of round, or you see frass, ant trails, or larger torn openings.
Start here: Do not assume carpenter bees. Look for carpenter ants, birds, or general rot damage instead.
Most likely causes
1. Active carpenter bee nesting in a wood soffit panel
Carpenter bees usually leave a clean, round entry hole and may leave light sawdust, yellow staining, or buzzing activity near the eaves.
Quick check: Watch the area for a few minutes in warm daylight. If a bee hovers, enters, or circles the same spot, treat it as active.
2. Old carpenter bee holes in otherwise sound soffit wood
You may see round holes from a past season with no fresh dust, no staining, and no current bee traffic.
Quick check: Probe the wood around the hole. If it is dry and firm and you see no activity after repeated checks, a localized patch may be enough.
3. Rotten soffit wood that attracted repeat insect damage
Bees prefer workable wood, and moisture-damaged soffit often gets hit again because the surface is already weak.
Quick check: Press an awl or screwdriver into the area around the hole and along seams. If the wood crushes easily, plan on replacing that section.
4. Lookalike damage from carpenter ants or other pests
Ant damage is usually less perfectly round and often comes with coarse frass, hidden galleries, or activity at joints and cracks instead of one neat entry hole.
Quick check: Look for ant trails, ragged openings, or debris that looks like shredded wood and insect parts rather than a clean drilled hole.
Step-by-step fix
Step 1: Confirm whether the holes are active right now
You want to avoid sealing live insects into the soffit or patching a spot that will be reopened in a day or two.
- From the ground or a stable ladder, watch the soffit area for several minutes during a warm, bright part of the day.
- Look for hovering bees, repeated returns to one hole, fresh light-colored dust, or new yellow-brown streaking below the opening.
- Mark suspicious holes lightly with painter's tape so you can tell whether activity is tied to one spot or several.
- If you are unsure after one look, check again later the same day instead of guessing.
If you confirm no current activity after repeated checks, move on to testing the wood condition and planning the repair. If bees are actively using the holes, do not patch yet. Arrange treatment or removal first, then come back to the wood repair after activity stops.
Active use means the insect issue is still live. Inactive holes may just need repair, but only if the surrounding soffit is solid.
Stop if:- You cannot inspect safely from a ladder.
- You see a large number of bees or aggressive swarming.
- The soffit is high, unstable, or directly over a steep roof edge.
Step 2: Check whether the soffit wood is solid or already rotted
A sound panel can often be patched. Soft, swollen, or crumbling soffit needs replacement, not cosmetic filler.
- Use an awl or small screwdriver to press around each hole, along panel seams, and near any stained areas.
- Tap the soffit lightly and listen for a sharp solid sound versus a dull hollow sound.
- Look for peeling paint, swollen edges, dark water marks, sagging, or open joints near the damaged area.
- If the soffit is vented, inspect the vent openings too. Damage around vents can hide loose material and nesting debris.
If the wood stays firm and dry around the holes, you likely have a patch-and-seal repair instead of a full panel replacement. If the tool sinks in easily or the panel breaks apart, plan to replace the damaged soffit section and check for moisture above it.
Firm wood supports a localized repair. Soft wood means the visible hole is only part of the problem.
Step 3: Look for the source that made the soffit vulnerable
If you skip the source check, the repair may look good for a season and then fail again from moisture or repeat nesting.
- Check the gutter edge above the damage for overflow marks, loose fasteners, or water running behind the gutter.
- Look for roof drip issues, missing paint, open joints, or unsealed end grain on wood soffit pieces.
- Inspect nearby fascia and trim for matching softness or insect holes.
- If the damage is near a vented soffit, make sure the vent area is not trapping debris and moisture.
If you find only dry, localized damage, you can repair the soffit section once the bee activity is gone. If you find active leaks, chronic wetting, or damage spreading into fascia or roof edges, fix that source before finishing the soffit repair.
Step 4: Choose the repair: patch sound wood or replace the damaged soffit section
This is where the repair path becomes clear. Small inactive holes in solid wood can be filled, but soft or tunneled panels should be cut out and replaced.
- For a few inactive holes in solid wood, clean out loose dust, fill the openings with an exterior-grade wood filler or epoxy wood repair filler, let it cure, then sand smooth.
- Prime and repaint the repaired area so the patch is sealed and the wood surface is less inviting.
- For soft, split, or heavily tunneled soffit, remove the damaged section carefully and install a matching soffit replacement panel or board.
- If you open the area and find hidden galleries extending farther than expected, keep removing damaged material until you reach solid wood.
If the patch stays tight or the new panel fits solidly with no remaining soft wood, finish with primer and paint. If filler will not hold, the hole keeps breaking out, or the damage spreads beyond the first cut, stop patching and replace a larger soffit section.
Step 5: Finish the repair and watch for return activity
The job is not done when the hole is filled. You want the soffit sealed, painted, and checked long enough to know the problem is actually over.
- Prime any bare wood, filler, or cut edges, then apply exterior paint to match and protect the repaired soffit.
- Seal small joints only where they belong, not over vent openings or drainage paths.
- Over the next couple of warm days, watch the repaired area and nearby soffit for new hovering, fresh dust, or new holes.
- If new holes appear nearby, treat it as an active pest problem again instead of repeatedly patching fresh damage.
A good result: If the surface stays solid, dry, and quiet with no new activity, the repair is holding.
If not: If bees return or new holes show up in adjacent boards, bring in a pest-control pro or exterior carpenter to stop the nesting cycle and repair any additional damage.
A good finish coat protects the repair, but repeat activity means the issue was not fully resolved or the surrounding wood is still attractive to nesting.
Replacement Parts
As an Amazon Associate I earn from qualifying purchases. Repair Riot may earn a commission at no extra cost to you.
FAQ
Should I plug carpenter bee holes in the soffit right away?
Not until you are reasonably sure the holes are inactive. If bees are still using them, quick patching often leads to reopened holes or new holes nearby.
How do I tell carpenter bee holes from carpenter ant damage?
Carpenter bee holes are usually very round and clean. Carpenter ant damage is more ragged, often tied to cracks or joints, and may come with coarse frass and ant activity.
Can I just fill the holes and repaint?
Yes, but only when the surrounding soffit wood is dry and solid. If the wood is soft, hollow, or crumbling, filler is a short-term cosmetic patch and the section should be replaced.
Do carpenter bee holes mean the whole soffit has to be replaced?
No. A few inactive holes in sound wood can often be repaired locally. Replacement makes sense when tunneling is extensive, the panel is soft, or moisture damage has weakened the area.
Why do the holes keep showing up in the same area?
Usually because the wood stays exposed, weathered, or damp, or because old nesting spots were never fully addressed. Repainting and fixing moisture issues help, but active infestations need treatment before repair.
What if I see staining below the hole but no bees today?
That can still mean recent activity. Check again during a warm bright period before patching, and probe the wood to make sure the staining is not tied to hidden moisture damage.