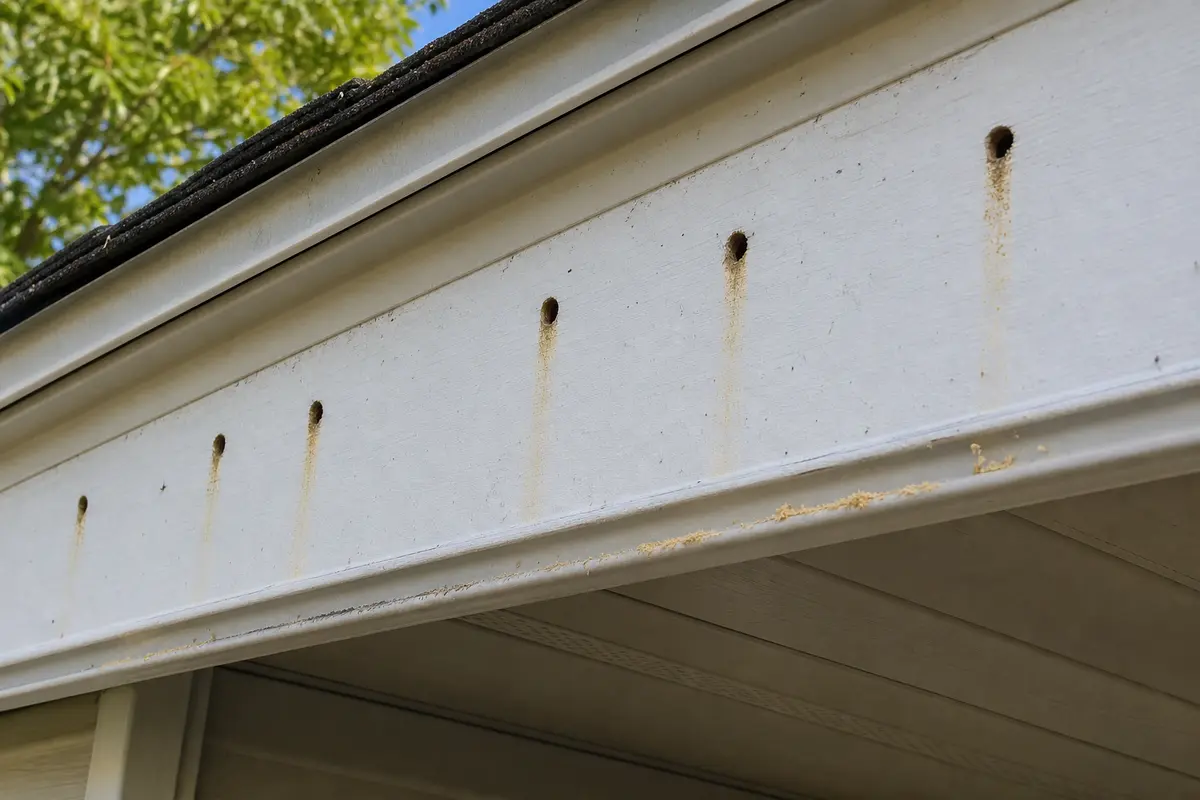
Is the hole clean, round, and about fingertip size?
Treat carpenter bees as the leading clue, then watch for active traffic before you patch the opening.
A clean round hole in fascia trim often points to carpenter bees. Before you patch, watch for hovering bees or fresh frass, then probe from a stable position to confirm the wood is still hard.
For a lasting repair, watch the hole first. If bees are active, handle that before sealing. After that, a hard probe result points to filler; soft, hollow, or split fascia points to replacement.
Start from the ground. Look for fresh frass, staining, hovering bees, and lifted lower-edge paint. Probe only from a stable position.
Don’t start with: Do not smear caulk over the opening first. Caulk can trap active use and hide soft trim.
Treat carpenter bees as the leading clue, then watch for active traffic before you patch the opening.
Pause the trim repair. Active use needs pest control or a safe exclusion plan before the hole is sealed.
Assume recent activity or damp, tunneled wood until you clean the area once and see whether debris returns.
Skip the filler plan. Soft fascia trim needs section replacement or a closer roof-edge repair inspection.
Expect more hidden tunneling than the face shows. Check the whole board run before buying patch material.
Do not treat it as a simple bee-hole patch. Identify carpenter ants, rot, or another pest path first.
The useful clues are visible before the repair starts: hole shape, fresh debris, staining, paint condition, and how the lower edge responds to light probing.
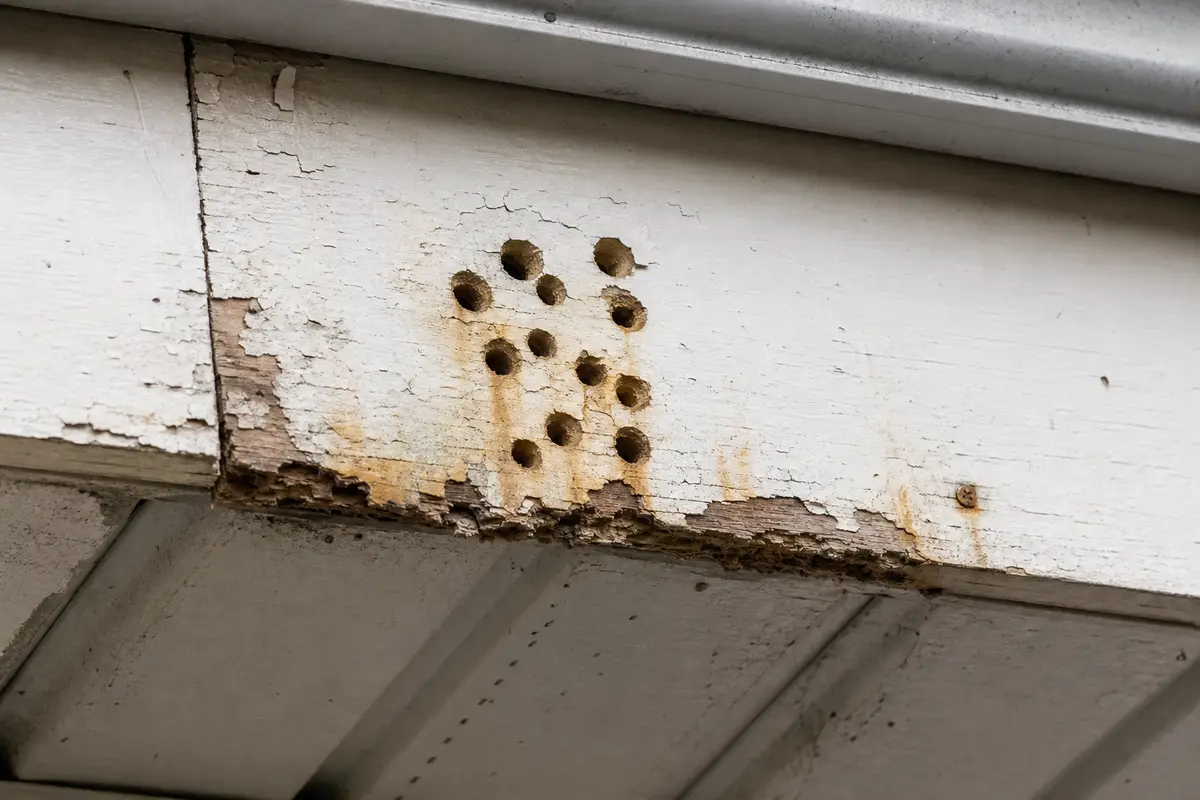
Match the exact diagnosis before buying. Confirm activity at the hole, probe the lower edge, and check board fit. Use filler only for inactive holes in hard, dry trim. Use epoxy filler when a chewed edge needs rebuilding but still resists the probe. Price a replacement board if the screwdriver sinks in, the board sounds hollow, the face splits, or holes cluster together. Pause if width, thickness, profile, or gutter clearance does not match the house.
A carpenter bee hole is the opening, not the whole problem. The board may be active, abandoned, weather-softened, or already damaged enough that a patch will not hold.
The bad first move is the one that hides activity or soft wood. Read the hole and the lower edge before you close anything.
Put the visible clue beside the wood-condition check before choosing a repair. That keeps a cheap patch from hiding active insects or soft roof-edge trim.
| What you find | What it usually means | Next move |
|---|---|---|
| One or two clean round holes, no fresh debris, firm trim. | Old or limited carpenter bee damage in sound wood. | Clean loose dust, patch with exterior wood repair material, prime, and paint. |
| Bees entering the same hole during warm daylight. | Active carpenter bee use. | Handle the pest issue safely before sealing the hole. |
| Fresh frass or yellow-brown staining below the opening. | Recent activity or damp tunneled wood. | Clean once, recheck for fresh debris, then probe before buying filler. |
| Several holes in a row or a hollow sound across the board. | Repeated use or longer hidden tunnels. | Plan for a broader inspection and possible fascia section replacement. |
| Soft lower edge, peeling paint, dark staining, or crumbling fibers. | Rot or weather-softened fascia. | Replace the damaged section and correct the water exposure. |
| Ragged openings, ant trails, or debris from seams. | A lookalike pest or moisture problem. | Identify that source before closing the trim. |
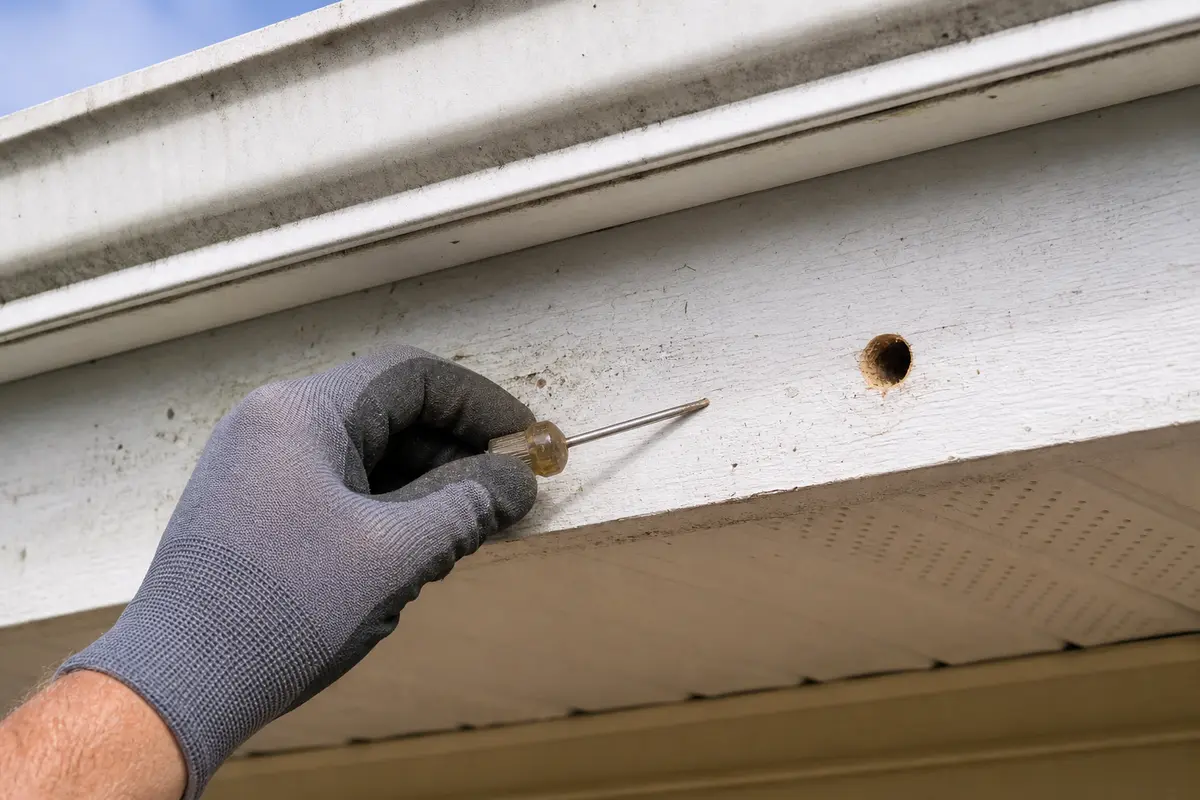
A probe check should compare firmness, not dig a new trench in the board. Use light pressure and stop when the trim gives you a clear answer.
A localized repair makes sense only when the bee use is inactive and the fascia still behaves like solid exterior trim.
Fascia trim sits at the roof edge, so soft wood can involve more than the board face. Replacement is the cleaner choice when the damage has moved past a small inactive opening.
Keep tools simple until the board proves it needs more than inspection. Most of the early work is watching, probing, cleaning, and painting from a safe setup.
Paid links. As an Amazon Associate I earn from qualifying purchases. Repair Riot may earn a commission at no extra cost to you.
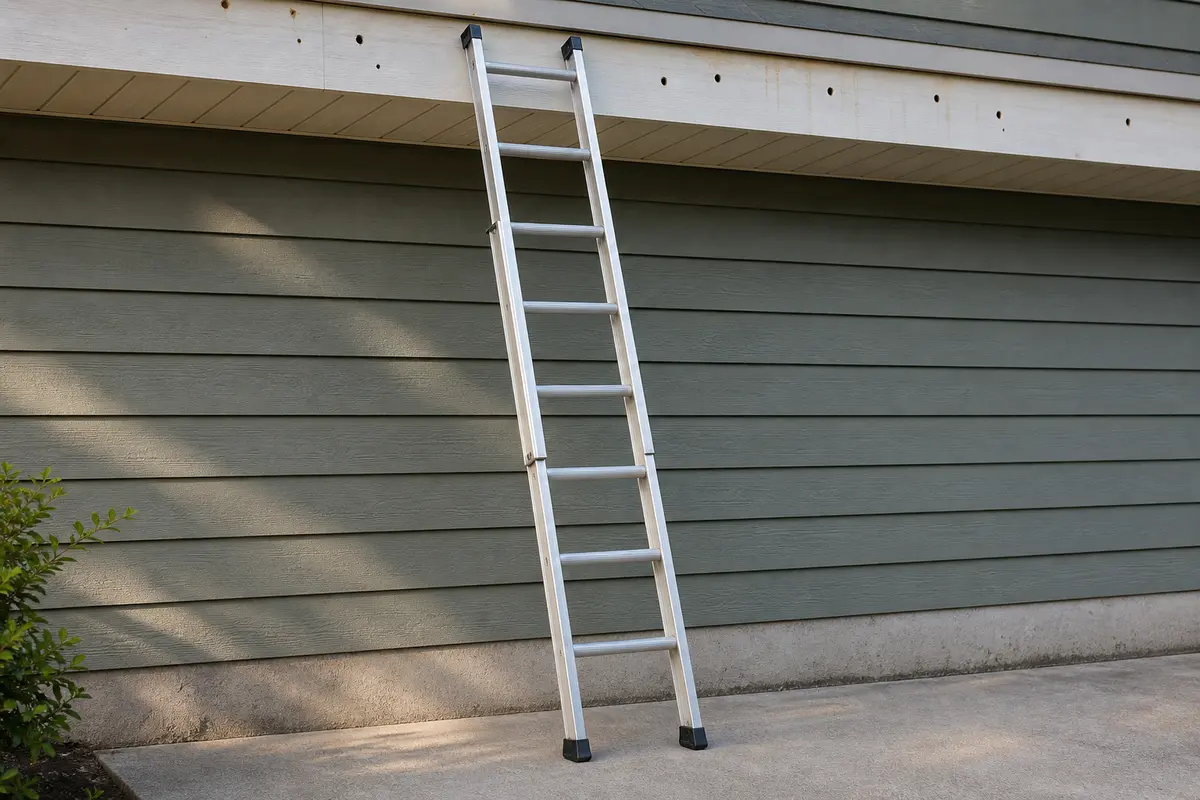
Helps when: Use a stable extension ladder only when the fascia can be reached without leaning or stepping onto a risky roof edge.
Skip it when: Skip ladder work if the hole is over a roof edge, near service wires, or outside centered reach.
Compare extension ladders on Amazon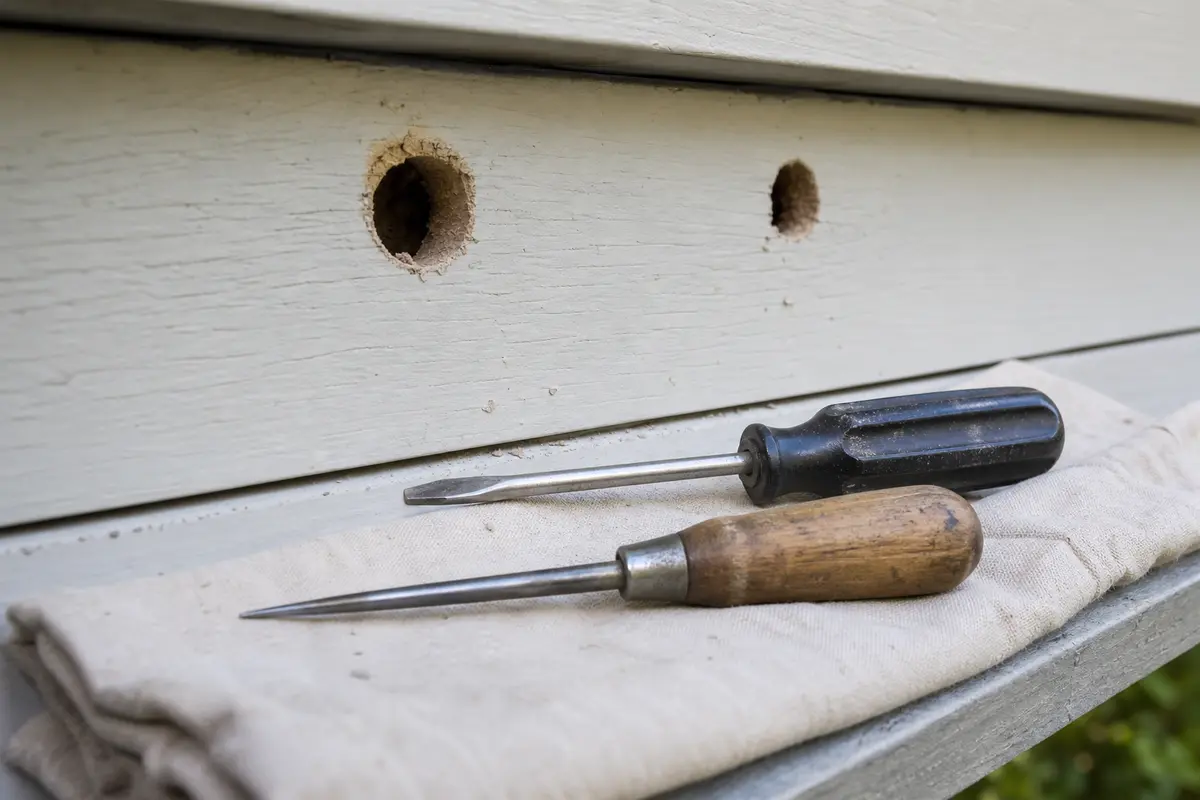
Helps when: Use a small screwdriver or awl with light pressure to compare suspicious fascia with nearby hard wood.
Skip it when: Skip aggressive probing when the face starts breaking away or the board supports a loose gutter.
Compare small screwdrivers and awls on Amazon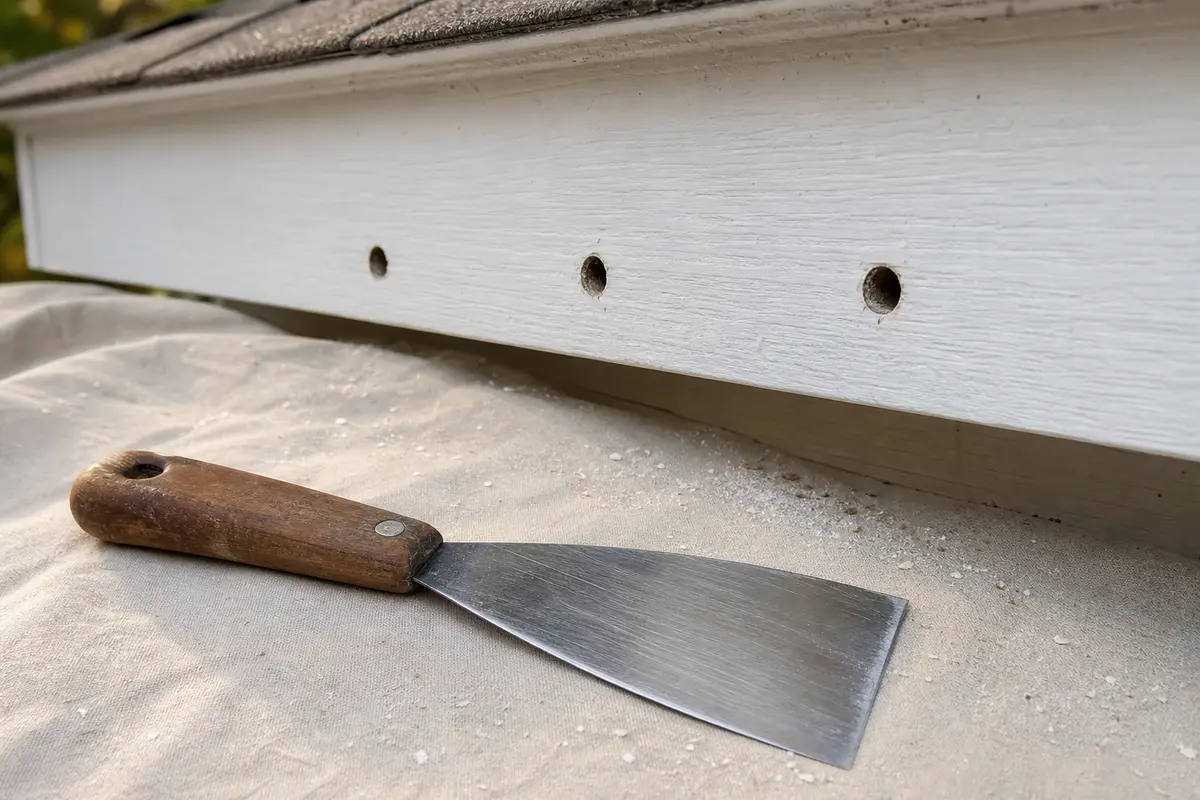
Helps when: Use a putty knife after the board is inactive and sound enough for a small filler repair.
Skip it when: Skip surface prep until active bee traffic is handled and soft trim has been ruled out.
Compare putty knives on AmazonDo not let the shopping list outrun the diagnosis. Watch for active bee traffic, probe the lower edge, and map how far the holes run. After those checks, choose filler for a few inactive holes in hard trim, epoxy for a chewed edge in otherwise solid wood, or a matched fascia board for soft, hollow, split, or clustered damage.
Paid links. As an Amazon Associate I earn from qualifying purchases. Repair Riot may earn a commission at no extra cost to you.
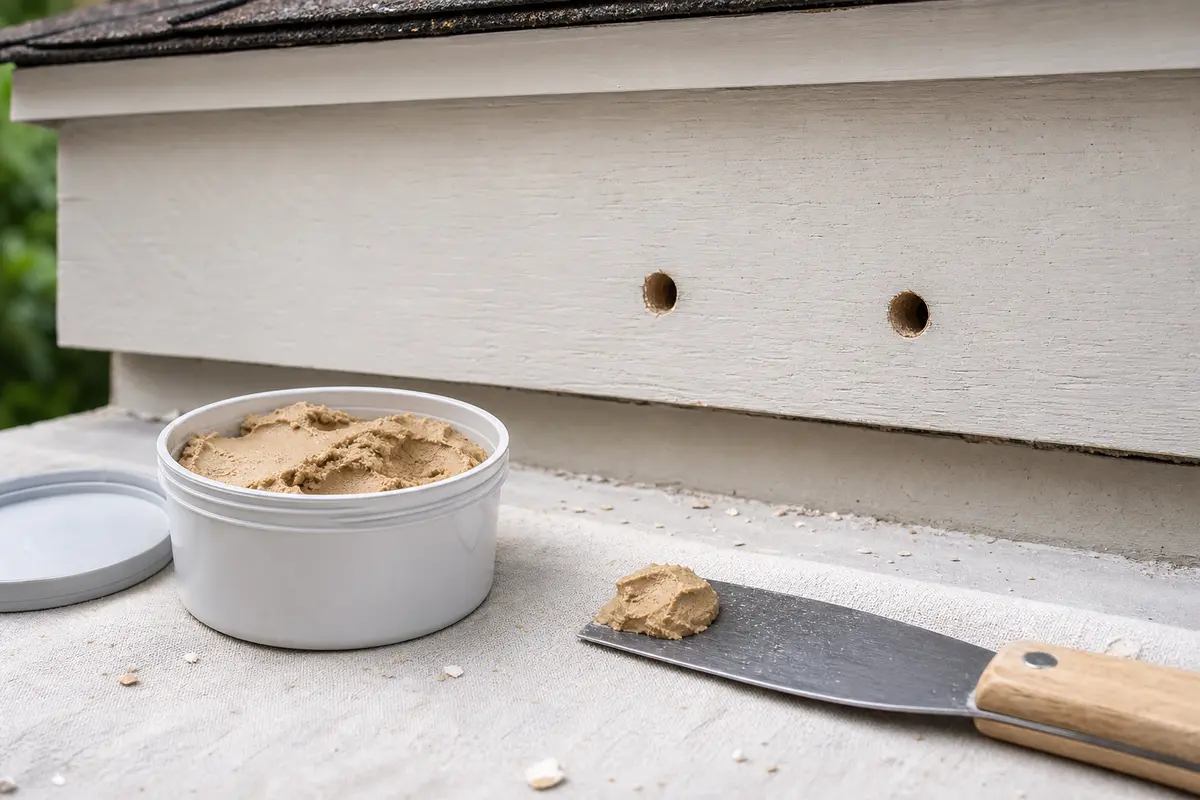
Helps when: Use exterior wood filler for a few inactive holes in hard, dry fascia after loose dust is cleaned out.
Skip it when: Skip it when the probe sinks in, holes are clustered, or bees are still using the opening.
Compare exterior wood fillers on Amazon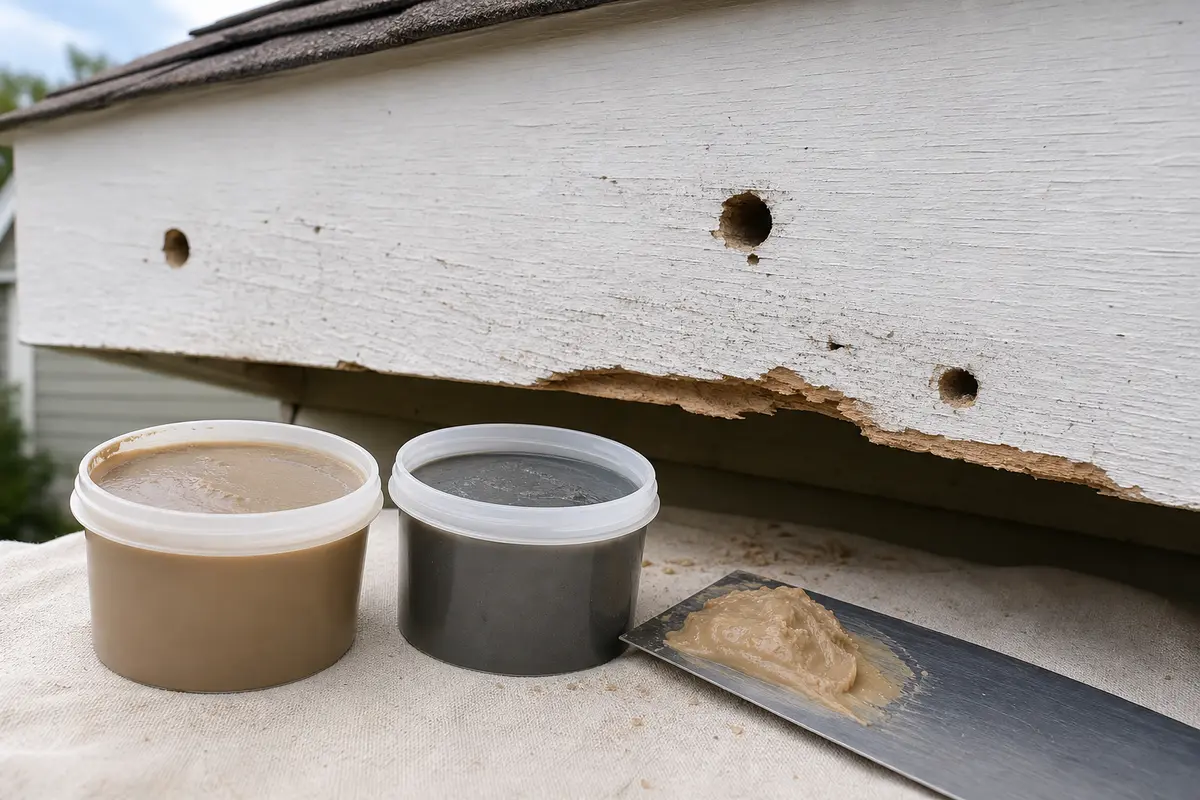
Helps when: Use exterior epoxy wood repair filler to rebuild a chewed edge when the rest of the fascia board is still solid.
Skip it when: Skip it when the lower edge is soft, hollow, split, or stained from moisture.
Compare exterior epoxy wood repair fillers on Amazon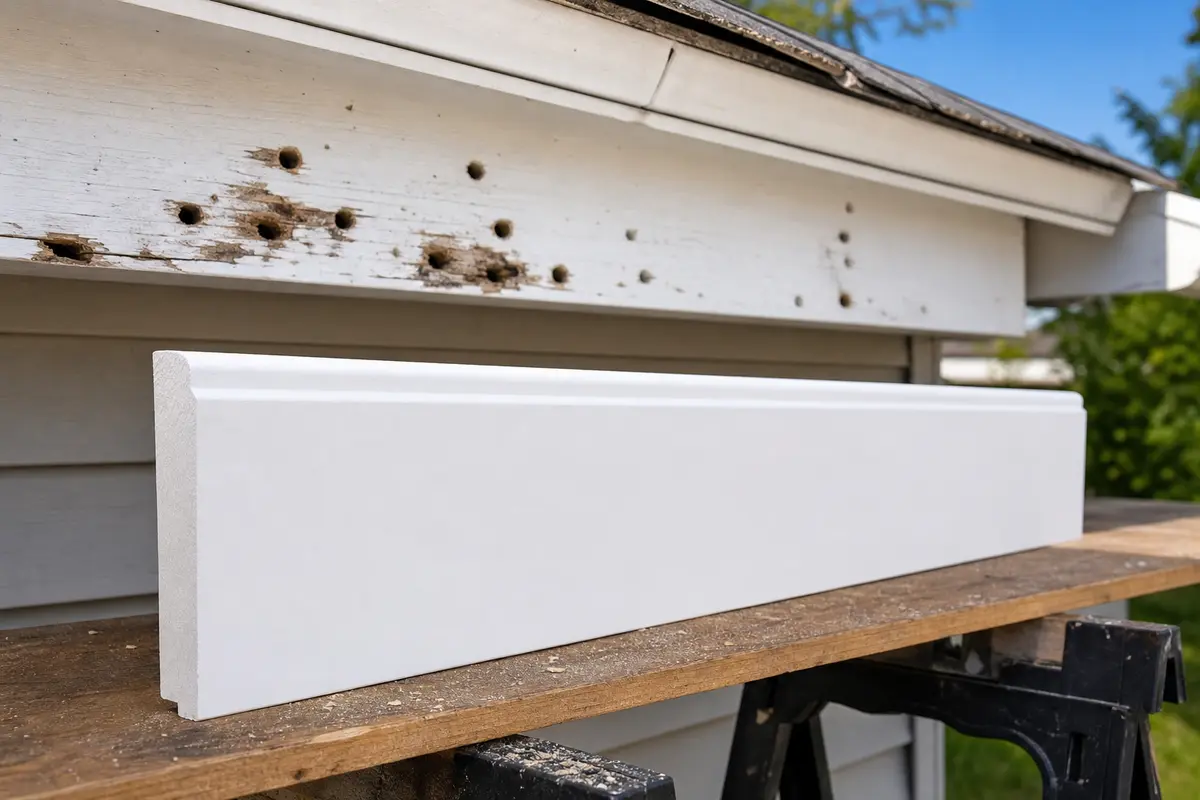
Helps when: Use a primed fascia trim board when the section is soft, hollow, split, or drilled in several places.
Skip it when: Skip buying until you match board width, thickness, profile, and gutter or drip-edge details.
Compare primed fascia trim boards on AmazonOne or two clean holes in hard trim are usually not structural. Probe the lower edge and listen for a hollow spot near the hole. If the board feels crumbly under the screwdriver or the lower edge is soft, treat it as a trim replacement job.
Not as a first move. Caulk is a poor fix for damaged wood, and it does nothing if the bees are still active or the fascia trim is soft. Confirm activity, check the wood condition, then use the right filler or replace the board.
Carpenter bee holes are usually clean, round openings in the face or underside of the trim. Carpenter ant damage is usually rougher: look for frass, ant activity, or galleries pushing out from cracks and seams instead of one neat circular opening.
Replace it if a light screwdriver probe sinks in, if the board sounds hollow beyond the hole, if the face splits apart, or if several holes sit close together. Patch only after active use is handled or ruled out and the surrounding wood stays hard and dry.
Fresh sawdust-like frass below a round hole usually means recent activity. Clean it away once, watch the hole in warm daylight, and do not seal the opening until active use has been handled.
Yes, if bees are entering or returning to the same hole. The wood repair comes after active use is stopped and the board is checked for firmness.
Paint helps because it protects the wood surface and makes weathered trim less attractive. It is not a guaranteed stand-alone fix if bees are active or the trim is deteriorated.
They can. Old tunnels and weathered trim often get reused or attract new drilling nearby. Watch the same eave line during the next warm spell; if fresh traffic or dust returns, handle the active pest issue first, then make the solid wood repair and seal the painted surface.
Repair Riot built this page around ground-visible fascia clues: clean round holes, fresh frass, yellow-brown staining, hovering bees, probe firmness, and soft lower-edge trim.